SSH With No Password Using Public Key Cryptography
In the last blog post, we covered how to set up a headless Raspberry Pi, and we connected to our Raspberry Pi by using the Secure SHell (SSH) protocol. This is a really good protocol for connecting to servers, and is used pretty ubiquitously in the industry. However, with our current setup, our Raspberry Pi still suffers from one crucial issue when connecting through SSH: it relies on a password.
Passwords are something I have hated for quite some time. They are a simple (bad) solution to the complex problem of authentication. More often than not, they are easy to guess, regularly reused, and too easily we as human beings can be tricked into giving them away.
I believe it's important to understand why you should use SSH keys, and have at least some understanding as to how it works. I have included as part of this guide a quick primer on authentication and a very quick primer on public key cryptography. These are not important to setting up passwordless SSH access, so feel free to skip it if you already understand these concepts, or don't feel the need to read through them.
A Quick Primer on Authentication
There are three main ways you can be authenticated as a user:
- Something you know
- Something you have
- Something you are
Passwords would fall into the first category: something you know. Unfortunately, if your authentication relies only on something you know, it is often easy to steal or in some other way have it be compromised. One common way that this happens is through leaked passwords: If a service you once signed up for with the same password has their database be stolen, and they didn't take proper steps to secure that database, your password (regardless of how good it might be) could be compromised.
If you have an iPhone, or many of the more recent Android devices, you are likely familiar with the third category: with Face ID the iPhone is able to evaluate your face and determine if it is you, and with Touch ID (and the Android fingerprint sensors) your phone is able to use your fingerprint to determine identity.
You might also be familiar with the second category. It is becoming increasingly common for services to use multi-factor authentication, which uses more than one item to secure your account. Usually, this is something like a one-time password provided by applications such as Google Authenticator, Authy, or Microsoft Authenticator. A different method that uses the same basic principle is to use a hardware-based key, such as a YubiKey. When I was a Google intern, they provided hardware keys to secure our employee accounts, and it has been very successful in preventing account takeovers.
The goal of this guide is to move our SSH authentication from a password (something you know, which can be compromised) to something you have (your computer). The way we do this is through something called "Public Key Cryptography"
A Very Quick Primer on Public-Key Cryptography
I won't go over public-key cryptography in a lot of detail in this post, since it's a very complex topic that I could not hope to do justice in a single post, let alone a section of one. The most important thing to know at a high level is that public key cryptography uses a pair of very large numbers (which we call keys), one of which you must keep secret (the private key), and one of which you can give to others (the public key).
With your private key, you can sign some information to confirm that it came from you, and anyone that has a copy of your public key can verify the signature. This means that keeping the private key secret is very important, since anyone who has access to it can effectively impersonate you. However, unlike passwords, you never actually provide the private key to a service you are using, which means you can use the same pair of keys as much as you would like. Since your public key can be published anywhere safely (assuming your private key is secret), it can never render your account vulnerable if it is stolen from a service you use.
To authenticate with our Raspberry Pi, we will be using the ED25519 signing scheme, which is based on something called "Elliptic-curve Cryptography". If you're familiar with some amount of cryptography, you might be familiar with RSA, which is a commonly-used system, and might be wondering why we would use a different system. RSA is not considered to be secure for key sizes below 2048 bits, and compared to ED25519 it is substantially slower and has a substantially larger key size. ED25519 is still considered to be computationally secure, so it provides comparable protection (in that it cannot be broken, to our knowledge, with existing and expected near-future technology within the lifetime of the universe).
Why Should I Care?
That is a very good question. The first reason why you might care is that by switching over to using keys you will be able to log in without having to type a password each time. The convenience factor is the primary reason for most people. As an added perk, your system also becomes safer: it is easier to steal a password than it is to steal a specific file on your computer.
As a consequence, only the machines that you've previously uploaded SSH keys from will be able to connect to your RasPi.
Creating your SSH Key
The very first step in setting up public key based authentication is to actually create the key. If you're on Unix or Mac OS (this also includes using WSL/WSL 2 on Windows), you can run the following command to start the key creation process:
ssh-keygen -t ed25519Select the file name or leave it blank to use the default filename (~/.ssh/id_ed25519). Then, set a passphrase for that key. This passphrase will be used to "lock" your private key, so that even if it gets stolen, the attacker would need to know that passphrase to access the key and subsequently access your Raspberry Pi.
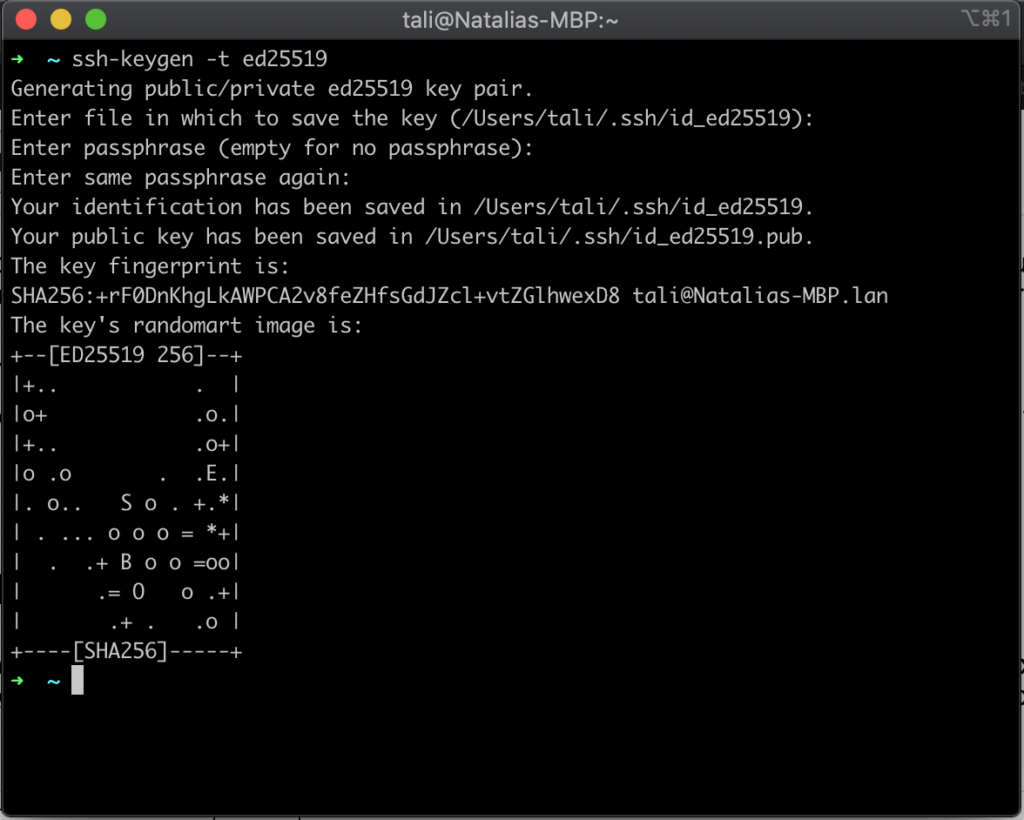
This will generate two files: ~/.ssh/id_ed25519 and ~/.ssh/id_ed25519.pub. As you might guess, the .pub file is the public key, and the file with no extension is the private key.
Adding the SSH Key to the Agent
Since the goal is for passwordless authentication, we're going to be adding our SSH key to the SSH agent, as well as instructing it to use the Keychain (for Mac). If you are using Linux, you might have to look into a comparable solution, such as Seahorse for Ubuntu. For Windows users, you'll need to look up how to use PuTTY and PuTTYgen for this.
If you are on Linux, you will also have to make sure that the SSH agent is started up. In your ~/.bashrc file, add the line $(eval ssh-agent) > /dev/null to the end, which should start up the agent.
Now that the SSH agent is started and we have our key set up, add it to the agent with the following command:
ssh-add -K ~/.ssh/id_ed25519This will prompt you for the passphrase to add it to the agent, and you will subsequently not need to type your password to use this identity file again until the next reboot.
Now, it is time for us to configure our SSH client. Create the file ~/.ssh/config with the following command and open it:
touch ~/.ssh/config && nano ~/.ssh/configNow, copy the configuration below and paste it in your terminal:
Host *
    UseKeychain yes   # Add this line only if you're on MacOS
    AddKeysToAgent yes
    IdentityFile ~/.ssh/id_ed25519
This will enable you to use the ~/.ssh/id_ed25519 key for any machine you are attempting to connect with. If you want to create a more specific scope and only use that file for specifically connecting to your raspberry pi, you can set the "Host" field to whatever the hostname you configured in the previous guide. For example, since my Raspberry Pi has a hostname of "steve", I would write my configuration as such:
Host steve.local
    UseKeychain yes
    AddKeysToAgent yes
    IdentityFile ~/.ssh/id_ed25519
The important line for making sure you don't need to type the password almost ever again (for Mac users) is the "UseKeychain" line. This will allow the SSH agent to communicate with your native Keychain, which stores passwords securely on your system.
Adding the SSH Key to the Raspberry Pi
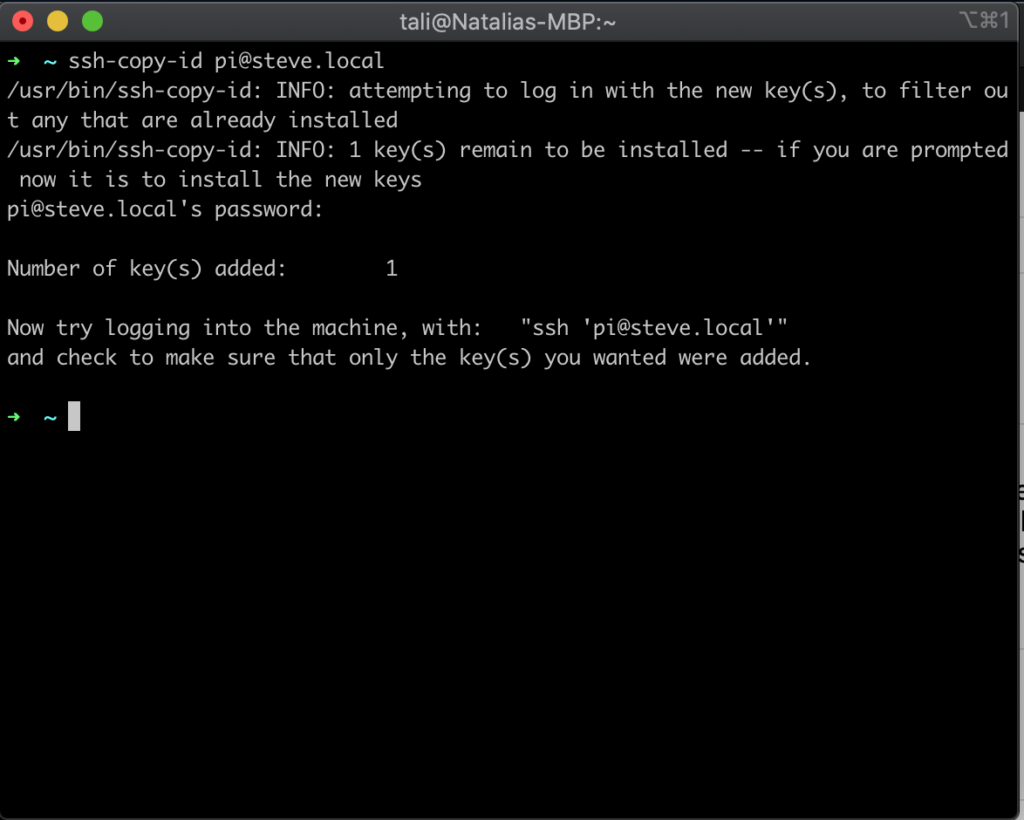
Transferring the SSH key to the host (the RasPi) is fairly simple. You can just run the following command, switching "steve.local" for the hostname of your Raspberry Pi.
ssh-copy-id pi@steve.localYou will be prompted for the password, and when you are done your key will be installed on the host system. It handles all of this for you.
ssh-copy-idConfiguring the SSH Server
Once our key is installed, we just need to configure our server to require a known key, and disable password-based login. To start, make a backup copy of the current configurations with the command
sudo cp /etc/ssh/sshd_config /etc/ssh/sshd_config.defaultThis will ensure that even if we mess up, we can always just return to the initial configuration that we know worked previously.
To start editing the file, run the command below, which will start up the text editor nano:
sudo nano /etc/ssh/sshd_confignano is a very simple text editor that comes bundled with Raspberry Pi OS. There are some other popular ones, such as vim and my personal favourite, emacs. Ultimately, it's a matter of preference, but for very quick file edits we can use nano very quickly.
You may have noticed that we have had to run the last two commands with sudo, which you might remember from the previous guide that I mentioned is something you should be careful of doing. This is one of the cases where sudo (which stands for "super user do") is necessary: The SSH server is run as "root" (which is akin to an admin user), so we need to run these commands with elevated permissions (i.e. "running as an administrator") to make them work. The majority of the files that are in the /etc directory will be owned by the "root" user, so you'll need to run commands with sudo to change them.
Now that we can change our configurations, let's start making our SSH server a little more secure.
- Find the line
#PermitRootLogin prohibit-passwordand change it toPermitRootLogin no- This will prevent the user "root" from ever being able to log in to SSH, which is generally desired since that is the user with highest permissions. Good practice is to use an account that has 'sudo' permissions, like our Pi account.
- Find the line
#PasswordAuthentication yesand change it toPasswordAuthentication no- This will disable the use of passwords and require us to have the SSH key installed.
- Find the line
#ClientAliveInterval 0and change it toClientAliveInterval 300- This will let the server check the client every 5 minutes to see if it is active
- Find the line
#ClientAliveCountMax 3and change it toClientAliveCountMax 0- This will make it so that if the server determines the client is not active after 5 minutes, it will end the session
- At the top of the file, add the line
AllowUsers pi- This will make it so that the only user that is allowed to login through SSH is the
piuser. If you want to add additional users that can be used to remotely connect, make sure to add them to this line, separated by a space character.
- This will make it so that the only user that is allowed to login through SSH is the
When you are finished with these changes, press CTRL+S to save the file and CTRL+X to exit. Finally, we need to restart our SSH server to enable these configurations. You can do it with the following command:
sudo systemctl restart sshOne last thing before we close out of our session! Open up a new terminal window (while leaving the current one open) and try to connect to the Raspberry Pi
ssh pi@steve.localIf you were able to connect without having to provide the password for the pi account, you are done! The Raspberry Pi will now allow you to log in without providing any password, while still allowing for protection against unauthorized access from any other machine.
To add more keys, you can do it in one of a few ways. If you would like to add more keys from the current machine, just create a new key and run ssh-copy-id again. Alternatively, if you want to add a key from a different machine, you can either:
- Revert back to the default configurations temporarily to add the new key:
- Make a backup of your current configurations (
sudo mv /etc/ssh/sshd_config /etc/ssh/sshd_config.bak) - Reload the default configurations (
sudo cp /etc/ssh/sshd_config.default /etc/ssh/sshd_config) - Restart the SSH server (
sudo systemctl restart ssh) - Add the new key the same way you did before (
ssh-copy-id pi@steve.local) - Delete the old default configuration (
sudo rm /etc/ssh/sshd_config) - Restore your proper settings (
sudo cp /etc/ssh/sshd_config.bak /etc/ssh/sshd_config) - Restart the SSH server to restore your configs (
sudo systemctl restart ssh) - This has the drawback that it requires you to lower the security of your pi, albeit just temporarily
- Make a backup of your current configurations (
- Or, you can send yourself the public key of the new machine to the one that can access the Raspberry Pi and copy it over:
- Send yourself the
.pubfile somehow. Email is fine, as is using iCloud/Google Drive/OneDrive/etc - Save it to your home directory with the name
id_ed25519_<machine_name>where<machine_name>is a name you choose for your computer - Run the following command:
- Send yourself the
cat ~/id_ed25519_<machine_name>.pub | ssh pi@steve.local "cat >> ~/.ssh/authorized_keys"This will copy the public key to the Raspberry Pi's authorized keys without having to change your settings. Once the new key is installed on the system with the command above, the new machine will be able to log in!
Wrapping Up
In this guide we went over a number of key concepts. We covered:
- Basic concepts of authentication
- Basic concepts of cryptography/signing
- How to create an SSH key
- How to add the SSH key to the
ssh-agent - How to configure the SSH client to use Keychain
- How to install an SSH key to your Raspberry Pi server
- How to configure the SSH server
- How to install new keys to the SSH server
- How to restart the ssh server so it picks up our new configs
In the next guide, we'll go over how to enable two-factor authentication as part of connecting to our Raspberry Pi through SSH. While this is not necessarily required, it is a simple and quick way to add extra protection to our sessions.
Enjoy Reading This Article?
Here are some more articles you might like to read next: