SSH Multifactor Authentication with Google Authenticator and YubiKey
In my previous guide, we went over how to enable passwordless authentication for SSH to increase the security of our Raspberry Pi, as well as how to configure the SSH server to have improved security. If you've been following along, you should now have a system with the following properties:
- The only user that can connect over SSH is the
piuser - The Raspberry Pi only accepts incoming connections through public key authentication
- 5 minutes of inactivity causes your SSH session to be terminated by the server
These are all great practices to start with, and should we open up our Raspberry Pi so that we can connect over SSH from anywhere in the world, we should be protected from anyone guessing our password or exploiting any other potential accounts on our system to log in through SSH.
There are, however, a handful of things that our system would not be protected against. For example, if we forget the computer open on a table while at a coffee shop (if we ever truly get back to being able to hang out at a coffee shop) or if the computer gets stolen, it would then be possible for an attacker to access our Raspberry Pi. Adding a second factor will help abate more sophisticated attacks, which might be required due to your threat model.
How Does Multifactor Authentication Work With SSH?
SSH, and many other applications, can use something called PAM (which stands for Pluggable Authentication Module). This module allows various applications to use a common authentication layer, which can communicate with different modules. Different companies (or individuals) can then write these modules, which we can install through the apt package manager.
For this specific guide, we'll be using Google Authenticator to set up Time-based One Time Password (TOTP) through a phone application (such as Authy, Google Authenticator, or Microsoft Authenticator), as well as setting up a physical hardware key using YubiKey. With the way we will be configuring our PAM, you will be able to use either of those methods for two-factor authentication, but if you would like you are also able to set up triple-factor by requiring both of these methods instead of just one. Personally, this goes beyond what my threat model requires: I set up both methods so that one can act as a backup to the other.
Setting up Google Authenticator
While you might be familiar with Google Authenticator as a phone application that allows you to scan QR codes to add two-factor authentication to your accounts, there is also a Google Authenticator PAM library to allow you to create a QR code to scan on your phone to provide the TOTP codes. While these two applications share a name, they are not necessarily linked: you can use any application that supports TOTP to scan the resulting QR code.
To start, let's connect to our Raspberry Pi. If you followed along the last tutorial, you should be able to do so without writing in your password. Since my Raspberry Pi's hostname is steve, I can connect to it with the following command:
ssh pi@steve.localNext, we need to install the PAM library, which we can do through our apt package manager:
sudo apt install libpam-google-authenticator -yOnce it has finished installing, we need to set up the TOTP application on a mobile phone. Personally, I use Google Authenticator for most of the 2FA I use for my accounts, so I will use it for this also, but any other authenticator would do.
When the download is completed, go back to your Pi terminal. Depending on how long it took your download to complete, you might have been timed out of your connection to the Raspberry Pi. This is good and expected behaviour: We do not want to allow idle sessions to live for very long. Once you are back in your RasPi shell, run the following command:
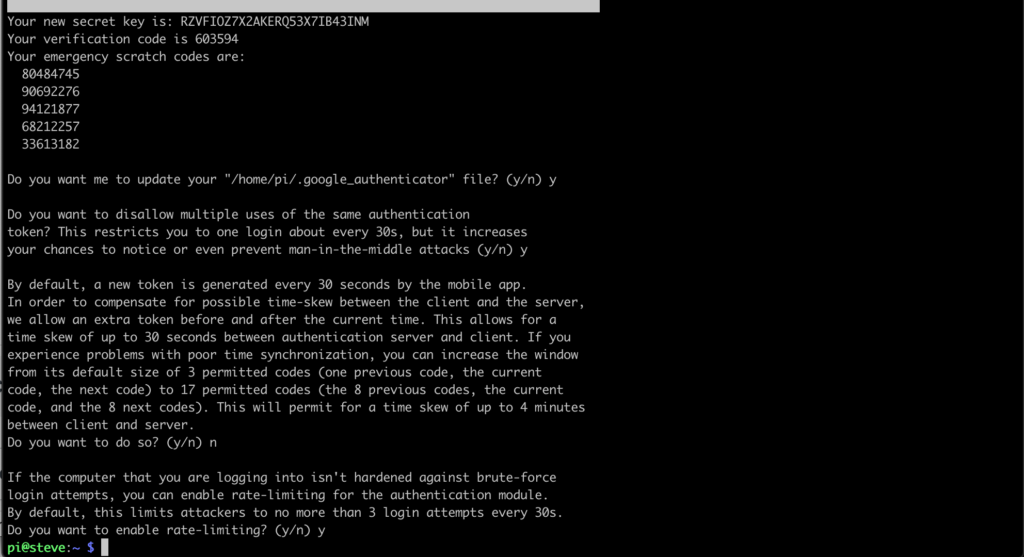
google-authenticatorThis will create a new secret key and a QR code for you to scan. Open up your authenticator application, click on "Scan QR code", and point your phone camera at the terminal. You might have to increase your terminal size and/or scroll up.

Your terminal will also display "emergency scratch codes". These should be kept hidden and protected somewhere only you can reach, as they are codes you can use in lieu of the TOTP codes displayed on your application. Personally, I write mine as a secure note on my password manager, Lastpass.
You will also be prompted for a series of configuration choices. You can read through them and decide what is most suitable for your own setup and network. You can see my configuration choices in the screenshot below:
Now that you've got that set up, it's time to tell PAM to use the Google Authenticator as well as enabling SSH to properly allow PAM to run. Let's start by going back to our /etc/ssh/sshd_config file. As we did last time, make sure to create a backup of the current configurations by running sudo cp /etc/ssh/sshd_config /etc/ssh/sshd_config.bak.
Open up the file now by using sudo nano /etc/ssh/sshd_config and make the following changes:
- Find the line
ChallengeResponseAuthentication noand change it toChallengeResponseAuthentication yes - Find the line
UsePAM yes, and add the lineAuthenticationMethods publickey,keyboard-interactivebelow it.
Now press CTRL+S to save and CTRL+X to exit. Now it's time for us to tell PAM to use our Google Authenticator TOTP for login, and to prevent it from requesting the password.
First, make a backup of the configuration file by running sudo cp /etc/pam.d/sshd /etc/pam.d/sshd.bak. Then, open up the file by running sudo nano /etc/pam.d/sshd, and make the following changes:
- Find the line
@include common-authand change it to be#@include common-auth- This will "comment out" the line, which in turn will disable PAM from trying to use the password for authentication
- Immediately below the
#@include common-authline, add the lineauth sufficient pam_google_authenticator.so- This will enable PAM to use the Google Authenticator module
Press CTRL+S to save the file and CTRL+X to close it. Then, run the following command to restart the SSH server:
sudo systemctl restart sshNow, before you close out of this session we should test to make sure our authentication is working appropriately.
Open up a new terminal window, and try to connect via SSH. You should be prompted to punch in your verification code (which is the TOTP that is now on your authenticator phone app). Put in the correct code, and it should let you in to your shell. If that is the case, congratulations! Your configurations work and you have now enabled TOTP multi factor authentication for connecting to your server.
If for some reason you cannot log in with your TOTP, you can go back to your original terminal session, and restore your original PAM and SSH configurations and try again. If the problem persists, I encourage you to reach out to me and I'd be happy to try to help you debug.
Setting up YubiKey for MFA
I'm a huge fan of hardware-based authentication. I wrote a little bit about how we used them when I interned at Google in my last blog post, and since working there I have purchased one of my own because I stand by their value. Additionally, while I am a security-conscious person, I am also a very lazy person by nature. I strongly believe in using multi factor authentication, but I also want it to be as simple as possible to use. Physical keys for MFA are perfect for this use: I can plug one in to my laptop when I log in, and whenever I need to prove my identity I just need to press a button. No need to pull out my phone, or copy over a code to my computer.
For those unfamiliar with what YubiKey is, they are a series of USB- & NFC-based security devices. The general premise is that you can plug one in to your computer, and by pressing a button you can generate a one-time passcode.
To use a Yubikey for MFA you will need your key identifier (which is part of your Yubico OTP that are generated by pressing the button on your Yubikey), and a Client ID from the Yubikey API.
Anatomy of a Yubico OTP
A Yubico OTP is comprised of two parts: The last 32 characters of the OTP are a randomly generated code, and the remaining characters at the beginning of the string are the identifier for the key. If you have a Yubikey, you can get the key identifier by cutting out the last 32 characters of a OTP that you generate, or you can run it through the python code below:
import sys

def extract_id(otp):
    return otp[:-32]

if __name__ == '__main__':
    print(extract_id(sys.argv[1]))
To run this code, copy and paste it into a file called otp.py then run the command python3 otp.py <OTP>, where <OTP> is a code you generated by pressing on your Yubikey.
Once you have your key ID, write it down somewhere as we will be using it soon.
Getting Your Yubico Client ID
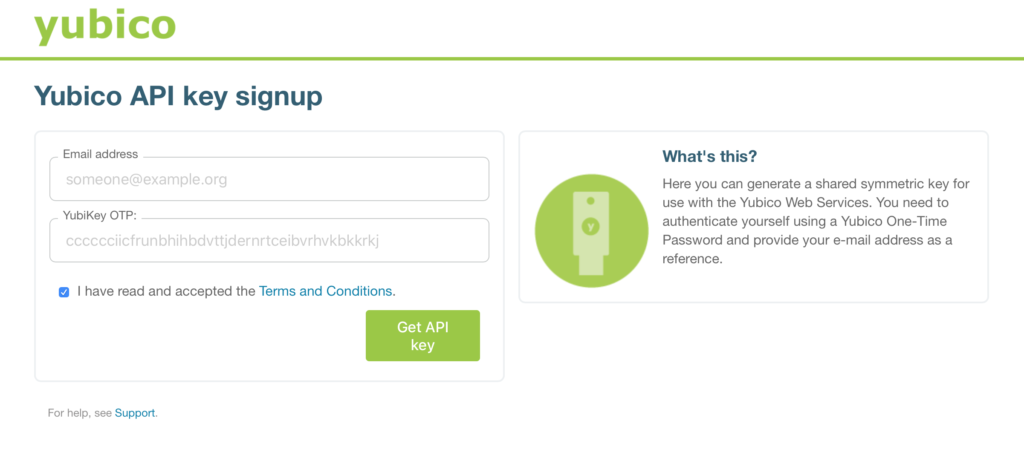
Navigate to the Yubico API Key signup page and put in your email, then press on your Yubikey to generate a OTP on the "YubiKey OTP" input box. You will need to accept the terms and conditions to proceed, and I recommend at least glancing through them. Once you are done, you can press "Get API Key", and you will be given a Client ID and a secret. You can note down the secret somewhere safe, such as a password manager, but we will not be using it further. The thing that is most important for our use is the Client ID.
Now that we have the pre-requisites, we can start setting up the Yubico PAM module.
Configuring PAM to use your YubiKey
First, we need to install the PAM library that will be used to authenticate with the YubiKey. You can do so by running the following command:
sudo apt install libpam-yubico -yOnce that is finished, we need to write a file that will allow us to associate a specific key ID to a specific user on our system. Let's create a file that we can keep in the /etc/pam.d directory that has all the users and their associated keys. Run the following command:
sudo touch /etc/pam.d/yubiauthThen open the file with nano. You should have a blank file now, and we need to populate it with our user ID, as well as the key ID, separated by the : character. For example, to associate the key with the ID abcdefg to our pi user, we would write the following:
pi:abcdefgThen press CTRL+S to save, and CTRL+X to close the file.
We can also associate more than one key to a user, and associate keys with other users. To add a key to the same user, add :<KEY_ID> to the end of the line, and to add a new user you should place it on a new line and add in the username and key id (or key ids) you want to associate with that user. For example, to add the key xyzabc to our pi user and also associate it to a different user called test, we would have our final file look as such:
pi:abcdefg:xyzabc
test:xyzabc
This file will allow PAM to confirm that the OTP that you provide during login is actually connected to the account you are trying to use.
Next, open up the /etc/pam.d/sshd file, and add the following line above the Google Authenticator line.
auth sufficient pam_yubico.so id=<CLIENT_ID> authfile=/etc/pam.d/yubiauthReplacing <CLIENT_ID> with the Client ID you got from the Yubico API key signup page.
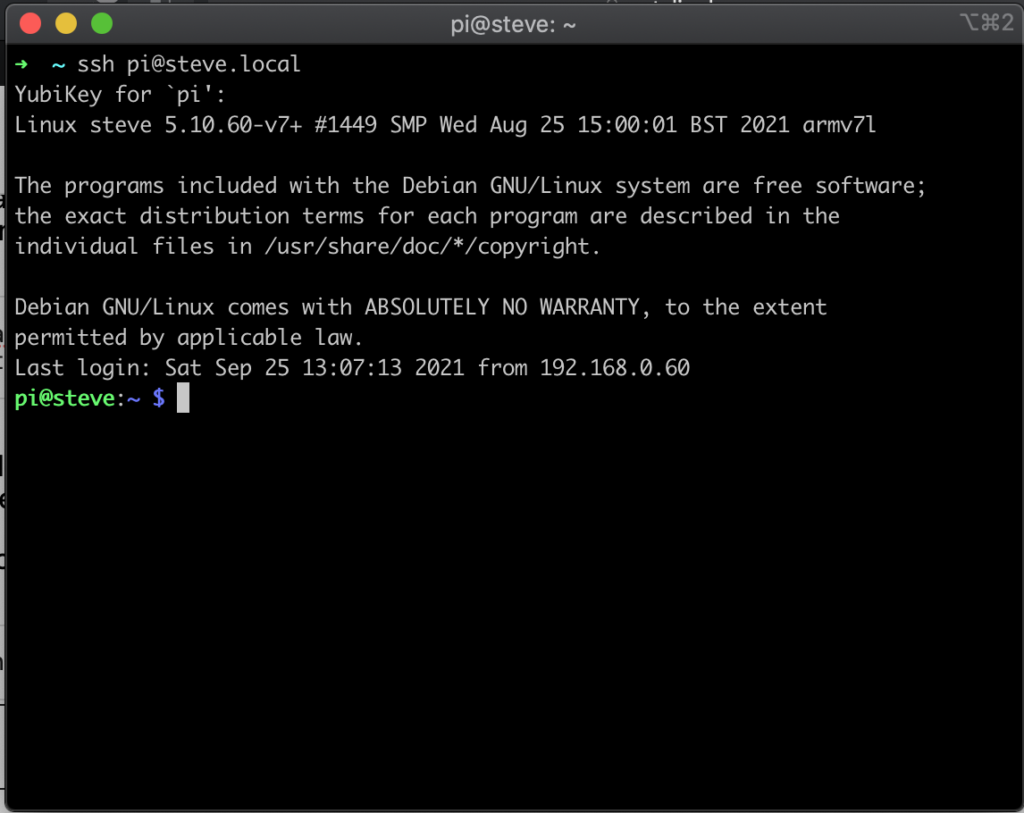
Once that is complete, open up a new terminal window, and attempt to connect to your Pi through SSH. It should now prompt you to press your YubiKey to allow you to log in:
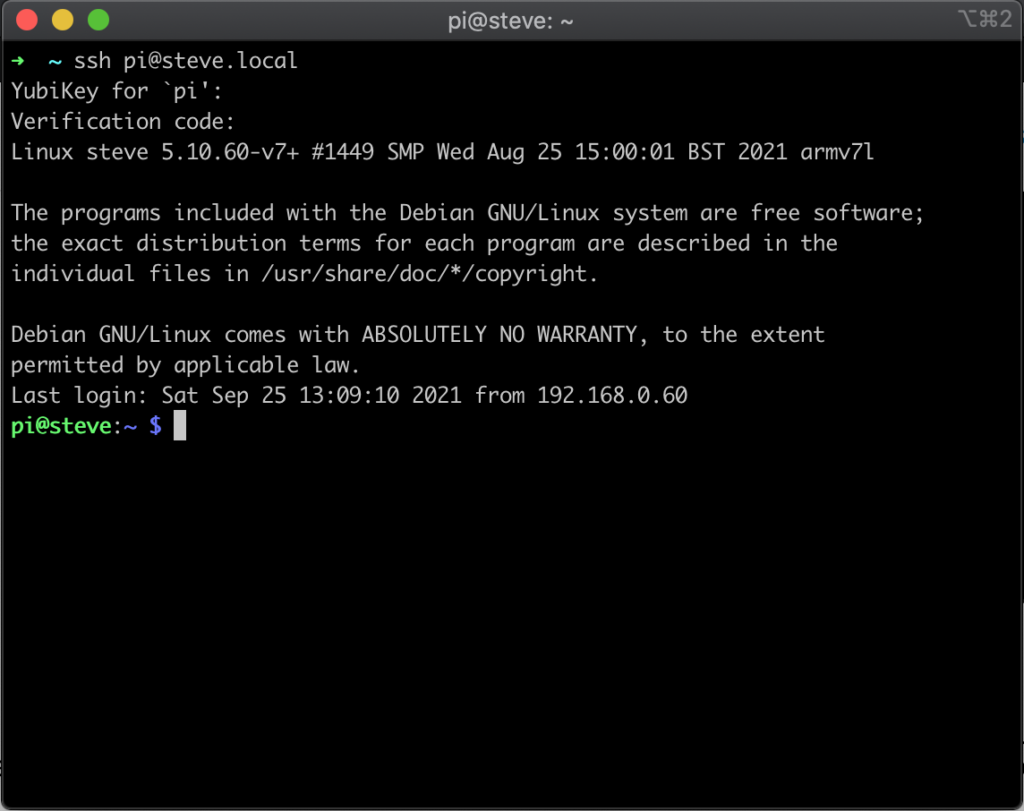
If you lose your YubiKey, or do not have it available, you will still be able to log in to your Raspberry Pi by using the Google Authenticator code that we set up earlier in the tutorial. You can see an example of that below:
If your want, or need, to have both of those set up simultaneously such that a user has to both have the YubiKey and the TOTP code you can simply edit the /etc/pam.d/sshd file, changing the word "sufficient" to "required" on the lines that we have added.
You might be wondering why we had to add the line above the one that was set up for the Google Authenticator. This is because we want the login to prompt for YubiKey first, and use the Google Authenticator more as a backup, as the YubiKey is more convenient. If this is not the case for you, and you want your SSH to prefer the Google Authenticator, you can swap the order of the lines. If you would like to disable either of those methods of 2FA, you can simply add a # to the beginning of the line. Note, if you want to disable both of the 2FA methods, you will also need to restore the old version of your /etc/ssh/sshd_config file, since your SSH will be expecting the multiple factors.
Wrapping Up
In this guide, we covered these concepts:
- How SSH can connect to the PAM modules to provide extra authentication
- How to enable multiple required factors for authentication
- How to install and set up Google Authenticator for using TOTP for our SSH sessions
- How to install and set up Yubico for hardware-based 2FA
At this point, our Raspberry Pi is fairly hardened against most common forms of attack: It does not use a password, it requires a private key that is encrypted in our system, and it requires the use of a secondary form of authentication.
For the next guide, we will be going over one incredibly cool software that we can run on our Raspberry Pi to improve our home networks by setting up a dedicated PiHole on our Raspberry Pi.
Enjoy Reading This Article?
Here are some more articles you might like to read next: