<?xml version="1.0" encoding="utf-8"?><feed xmlns="http://www.w3.org/2005/Atom" xml:lang="en"><generator uri="https://jekyllrb.com/" version="4.3.3">Jekyll</generator><link href="https://natalia.dev/feed.xml" rel="self" type="application/atom+xml"/><link href="https://natalia.dev/" rel="alternate" type="text/html" hreflang="en"/><updated>2024-07-12T15:47:28+00:00</updated><id>https://natalia.dev/feed.xml</id><title type="html">blank</title><subtitle>Trying my best and blogging about it </subtitle><entry><title type="html">Docker Health Checks on Distroless Containers with Rust</title><link href="https://natalia.dev/blog/2023/03/docker-health-checks-on-distroless-containers-with-rust/" rel="alternate" type="text/html" title="Docker Health Checks on Distroless Containers with Rust"/><published>2023-03-15T00:00:00+00:00</published><updated>2023-03-15T00:00:00+00:00</updated><id>https://natalia.dev/blog/2023/03/docker-health-checks-on-distroless-containers-with-rust</id><content type="html" xml:base="https://natalia.dev/blog/2023/03/docker-health-checks-on-distroless-containers-with-rust/"><![CDATA[<style type="text/css">table{width:100%;margin-bottom:1rem}</style> <p>Recently, I was on a call with a friend who mentioned he was having an infrastructure problem with his home lab setup. He uses Docker Compose to manage his services, and wants to introduce health checks to all his images so he can use a tool like <a href="https://hub.docker.com/r/willfarrell/autoheal/">autoheal</a> to restart unhealthy ones. However, some of the containers he uses in his setup are based off of <a href="https://github.com/GoogleContainerTools/distroless">distroless</a> images, which prevented him from using existing tools in the container like <code class="language-plaintext highlighter-rouge">curl</code> and <code class="language-plaintext highlighter-rouge">wget</code>.</p> <p>I’ve been working to improve my Rust skills, and a lot of what I do is related to infrastructure. This seemed like an interesting project to sink my teeth into, so I volunteered to build something to help.</p> <h2 id="a-word-on-distroless">A Word on Distroless</h2> <p>“Distroless” is a container setup in which the final image that you ship contains only the bare-minimum dependencies required to run your service. Some languages, like Go and Rust, are predominantly statically-linked- which means that it’s possible for them to have no external dependencies. For an application that is fully statically linked, none of the standard things most applications rely on (like <code class="language-plaintext highlighter-rouge">libc</code>) need to exist in the container, so you get a very tiny final image. That is exciting for several reasons that deserve their own blog post, but not great if you need to use tools that rely on those standard libraries.</p> <h2 id="first-attempts-with-existing-tools">First Attempts with Existing Tools</h2> <p>When we were talking it over, my friend mentioned he tried a few things to get these checks to work. Ultimately, he needed something that could make HTTP calls and return a status code for the health check, so at first he tried:</p> <ol> <li>Mounting the <code class="language-plaintext highlighter-rouge">curl</code> binary in the container. This didn’t work because it’s dynamically linked and the libraries weren’t mounted</li> <li>Mounting the <code class="language-plaintext highlighter-rouge">wget</code> binary in the container. Similarly, this is dynamically linked</li> </ol> <p>Trying to mess around with mounting libraries was not desirable, and neither was building a new container based on the application used- those things are a little too finicky and it’s usually better to rely on the existing publishing infrastructure managed by the people actually writing these apps.</p> <h2 id="the-requirements">The Requirements</h2> <p>We chatted it over and came up (informally) with a small list of what was needed of the tool. Writing this up now, we can loosely split them up by priority as I understood them at the start:</p> <p>P0 (main priority):</p> <ol> <li>The tool needs to be able to make an HTTP GET request to a URL specified by the command line</li> <li>On a successful request, it needs to return an exit code of 0</li> <li>On any failure, it needs to return a non-zero exit code</li> <li>The tool needs to be fully statically linked so it can run on any x86_64 container, including distroless</li> </ol> <p>P1 (key, but less important):</p> <ol> <li>The final binary needs to be reasonably small. The base container we were working with was ~4-5 mb in size, and I did not want to significantly bloat it</li> <li>The tool needs to be reasonably efficient. It should not meaningfully increase the resource requirements to run the application.</li> <li>The tool needs to be reasonably easy to use.</li> </ol> <p>P2 (nice-to-haves):</p> <ol> <li>The tool should be easy to consume. This could mean a pipeline, publishing it to a package registry, or even making the code available in an easy-to-build way.</li> <li>Support for TLS as an optional feature</li> </ol> <h3 id="benchmarking">Benchmarking</h3> <p>As part of the P1-1 requirement, I wanted to also check what the size of the existing HTTP clients are, since they’re standard and contain quite a few features. If I’m building a minimal application, I should strive to not be substantially larger than existing tools that are more comprehensive. Ideally, my application should be even smaller than what is available.</p> <p>I picked the <code class="language-plaintext highlighter-rouge">alpine</code> container to check the size of these binaries and their libraries since <code class="language-plaintext highlighter-rouge">alpine</code> tends to be very minimal. First, I checked the size of <code class="language-plaintext highlighter-rouge">wget</code> and its dependencies:</p> <p><img src="/assets/2023/03/image.png" alt="checking the size of `wget` and its dependencies"/></p> <p>Then, I checked <code class="language-plaintext highlighter-rouge">curl</code>:</p> <p><img src="/assets/2023/03/image-1.png" alt="checking the size of `curl` and its dependencies"/></p> <p>
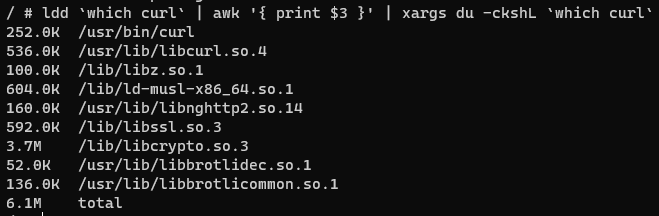
Now, I have my target to beat: 1.4 mb for <code class="language-plaintext highlighter-rouge">wget</code> and 6.1 mb for <code class="language-plaintext highlighter-rouge">curl</code>. Any binary that I build that has minimal functionality should be within that ballpark.</p> <h2 id="implementing-httpget">Implementing HttpGet</h2> <h3 id="preliminaries">Preliminaries</h3> <p>From previous development experience (generally, and in Rust), there were a few things that I knew off-hand would be relatively simple:</p> <ol> <li>I had existing Rust projects that had Github Actions workflow files I could reuse/adapt, so testing/releasing the finished binary was going to be fairly trivial</li> <li>I knew the <a href="https://rust-lang-nursery.github.io/rust-cookbook/web/clients/requests.html">Rust Cookbook</a> has an example on how to make web requests, which is the core functionality of this tool</li> <li>Debug information and symbols could be stripped from the final binary to make it smaller</li> <li>By using the <code class="language-plaintext highlighter-rouge">x86_64-unknown-linux-musl</code> target in Rust, the final binary is statically linked</li> </ol> <p>Armed with this knowledge, I set out to create <code class="language-plaintext highlighter-rouge">httpget</code>.</p> <h3 id="first-pass-implementation">First Pass Implementation</h3> <p>The first implementation of <code class="language-plaintext highlighter-rouge">httpget</code> focused around using the <code class="language-plaintext highlighter-rouge">reqwest</code> library as that was what the cookbook recommended. The whole implementation took about 40 minutes to create from start to finish, mostly because I was already familiar with <code class="language-plaintext highlighter-rouge">reqwest</code> and <code class="language-plaintext highlighter-rouge">tokio</code>. Since TLS support was a P2, I started first with limiting the features of these crates to try to have the most compact binary. After some fiddling, version <a href="https://github.com/cryptaliagy/httpget/releases/tag/0.1.2"><code class="language-plaintext highlighter-rouge">httpget v0.1.2</code></a> was published on GitHub by the pipeline.</p> <div class="language-rust highlighter-rouge"><div class="highlight"><pre class="highlight"><code><span class="k">use</span> <span class="nn">reqwest</span><span class="p">::</span><span class="n">Client</span><span class="p">;</span>
<span class="k">use</span> <span class="nn">std</span><span class="p">::</span><span class="n">env</span><span class="p">;</span>

<span class="k">async</span> <span class="k">fn</span> <span class="nf">run</span><span class="p">(</span><span class="n">endpoint</span><span class="p">:</span> <span class="o">&amp;</span><span class="nb">str</span><span class="p">)</span> <span class="p">{</span>
    <span class="k">let</span> <span class="n">client</span> <span class="o">=</span> <span class="nn">Client</span><span class="p">::</span><span class="nf">builder</span><span class="p">()</span><span class="nf">.build</span><span class="p">()</span><span class="nf">.unwrap</span><span class="p">();</span>

    <span class="k">let</span> <span class="n">res</span> <span class="o">=</span> <span class="n">client</span><span class="nf">.get</span><span class="p">(</span><span class="n">endpoint</span><span class="p">)</span><span class="nf">.send</span><span class="p">()</span><span class="k">.await</span><span class="p">;</span>

    <span class="k">if</span> <span class="n">res</span><span class="nf">.is_err</span><span class="p">()</span> <span class="p">{</span>
        <span class="nd">panic!</span><span class="p">(</span><span class="s">"Can't reach route {}"</span><span class="p">,</span> <span class="n">endpoint</span><span class="p">);</span>
    <span class="p">}</span>
<span class="p">}</span>

<span class="k">fn</span> <span class="nf">main</span><span class="p">()</span> <span class="p">{</span>
    <span class="k">let</span> <span class="n">args</span><span class="p">:</span> <span class="nb">Vec</span><span class="o">&lt;</span><span class="nb">String</span><span class="o">&gt;</span> <span class="o">=</span> <span class="nn">env</span><span class="p">::</span><span class="nf">args</span><span class="p">()</span><span class="nf">.collect</span><span class="p">();</span>

    <span class="k">if</span> <span class="n">args</span><span class="nf">.len</span><span class="p">()</span> <span class="o">&gt;</span> <span class="mi">2</span> <span class="p">{</span>
        <span class="nd">panic!</span><span class="p">(</span><span class="s">"Too many arguments!"</span><span class="p">)</span>
    <span class="p">}</span>

    <span class="k">let</span> <span class="n">endpoint</span> <span class="o">=</span> <span class="n">args</span><span class="nf">.last</span><span class="p">()</span><span class="nf">.unwrap</span><span class="p">();</span>

    <span class="nn">tokio</span><span class="p">::</span><span class="nn">runtime</span><span class="p">::</span><span class="nn">Builder</span><span class="p">::</span><span class="nf">new_current_thread</span><span class="p">()</span>
        <span class="nf">.enable_time</span><span class="p">()</span>
        <span class="nf">.enable_io</span><span class="p">()</span>
        <span class="nf">.build</span><span class="p">()</span>
        <span class="nf">.unwrap</span><span class="p">()</span>
        <span class="nf">.block_on</span><span class="p">(</span><span class="nf">run</span><span class="p">(</span><span class="n">endpoint</span><span class="p">))</span>
<span class="p">}</span>

<span class="nd">#[cfg(test)]</span>
<span class="k">mod</span> <span class="n">tests</span> <span class="p">{</span>
    <span class="k">use</span> <span class="k">super</span><span class="p">::</span><span class="o">*</span><span class="p">;</span>

    <span class="nd">#[tokio::test]</span>
    <span class="k">async</span> <span class="k">fn</span> <span class="nf">can_reach_google</span><span class="p">()</span> <span class="p">{</span>
        <span class="nf">run</span><span class="p">(</span><span class="s">"http://google.com"</span><span class="p">)</span><span class="k">.await</span>
    <span class="p">}</span>
<span class="p">}</span>
</code></pre></div></div> <p>Looking over our requirements, it mostly looked like it matched quite a few of them:</p> <table> <thead> <tr> <th>P0 (main priorities)</th> <th>P1 (key, but less important)</th> <th>P2 (nice-to-haves)</th> </tr> </thead> <tbody> <tr> <td>HTTP GET requests</td> <td>2.87 mb binary</td> <td>Automatic Github publishing</td> </tr> <tr> <td>On success, 0 exit code</td> <td>Fast library, fast language</td> <td>Smaller than <code class="language-plaintext highlighter-rouge">curl</code></td> </tr> <tr> <td>On failure, non-zero exit code</td> <td>Easy CLI-ish</td> <td> </td> </tr> <tr> <td>Statically linked</td> <td> </td> <td> </td> </tr> </tbody> </table> <p>However, there’s some stuff I immediately didn’t like about this solution:</p> <ol> <li>No way to have TLS support. This became a problem since <code class="language-plaintext highlighter-rouge">httpget</code> was emitting panics when trying to reach sites like <code class="language-plaintext highlighter-rouge">http://github.com</code>, presumably because of <code class="language-plaintext highlighter-rouge">HTTPS</code> redirects. This would not be a problem in my friend’s home lab since they only needed <code class="language-plaintext highlighter-rouge">http</code>, but was a limitation.</li> <li>While 2.87 mb is relatively small (a little under half the <code class="language-plaintext highlighter-rouge">curl</code> benchmark), that seemed very excessive. I could not find a way to remove the <code class="language-plaintext highlighter-rouge">tokio</code> dependency from <code class="language-plaintext highlighter-rouge">reqwest</code>, which means that it was not possible to use this recommended crate without bundling an entire async runtime in the binary. It didn’t really matter too much since this isn’t being run on an embedded system, but it didn’t sit right with me that the tool would be this “big” with such limited functionality.</li> </ol> <h3 id="fixing-incorrect-requirements">Fixing Incorrect Requirements</h3> <p>After presenting this version to my friend, we chatted a bit more and eventually I realized I had misunderstood one of the P0 requirements: For <a href="https://docs.docker.com/engine/reference/builder/#healthcheck">healthchecks</a>, Docker requires very specific exit codes. For success, it does indeed use a 0 exit code (P0-2), but for failures it requires an exit code of 1. This means that P0-3 needed to be re-written:</p> <p>P0-3: On any request failure, the tool should return an exit code of 1.</p> <p>Unfortunately, since <code class="language-plaintext highlighter-rouge">v0.1.2</code> relied on <code class="language-plaintext highlighter-rouge">panic!</code> to register failures, the exit code for <code class="language-plaintext highlighter-rouge">httpget</code> was <code class="language-plaintext highlighter-rouge">101</code> on failures. This could be useful for some things (like being unable to build the async runtime) that represent unrecoverable errors in the setup, but everything else should set the right code.</p> <p>Luckily, Docker (like most platforms) seems to see a non-zero status code inherently as a failure, so the tool could be used until a fix was implemented. However, the behavior should not be relied on! It is possible that in the future, Docker could set exit codes that are neither 0 or 1 to mark health status as something else, like “unknown”.</p> <p>After some more fiddling with pipelines and implementing some better dev processes, <code class="language-plaintext highlighter-rouge">httpget v0.1.6</code> was <a href="https://github.com/cryptaliagy/httpget/releases/tag/0.1.6">released</a> with TLS support baked in (with <code class="language-plaintext highlighter-rouge">rustls</code>)</p> <div class="language-rust highlighter-rouge"><div class="highlight"><pre class="highlight"><code><span class="k">use</span> <span class="nn">reqwest</span><span class="p">::</span><span class="n">Client</span><span class="p">;</span>
<span class="k">use</span> <span class="nn">std</span><span class="p">::{</span><span class="n">env</span><span class="p">,</span> <span class="nn">process</span><span class="p">::</span><span class="n">ExitCode</span><span class="p">};</span>

<span class="k">async</span> <span class="k">fn</span> <span class="nf">run</span><span class="p">(</span><span class="n">endpoint</span><span class="p">:</span> <span class="o">&amp;</span><span class="nb">str</span><span class="p">)</span> <span class="k">-&gt;</span> <span class="nb">Result</span><span class="o">&lt;</span><span class="p">(),</span> <span class="nn">reqwest</span><span class="p">::</span><span class="n">Error</span><span class="o">&gt;</span> <span class="p">{</span>
    <span class="k">let</span> <span class="n">client</span> <span class="o">=</span> <span class="nn">Client</span><span class="p">::</span><span class="nf">builder</span><span class="p">()</span><span class="nf">.build</span><span class="p">()</span><span class="nf">.unwrap</span><span class="p">();</span>

    <span class="n">client</span><span class="nf">.get</span><span class="p">(</span><span class="n">endpoint</span><span class="p">)</span><span class="nf">.send</span><span class="p">()</span><span class="k">.await</span><span class="nf">.map</span><span class="p">(|</span><span class="n">_</span><span class="p">|</span> <span class="p">())</span>
<span class="p">}</span>

<span class="k">fn</span> <span class="nf">main</span><span class="p">()</span> <span class="k">-&gt;</span> <span class="n">ExitCode</span> <span class="p">{</span>
    <span class="k">let</span> <span class="n">args</span><span class="p">:</span> <span class="nb">Vec</span><span class="o">&lt;</span><span class="nb">String</span><span class="o">&gt;</span> <span class="o">=</span> <span class="nn">env</span><span class="p">::</span><span class="nf">args</span><span class="p">()</span><span class="nf">.collect</span><span class="p">();</span>

    <span class="k">if</span> <span class="n">args</span><span class="nf">.len</span><span class="p">()</span> <span class="o">&gt;</span> <span class="mi">2</span> <span class="p">{</span>
        <span class="nd">panic!</span><span class="p">(</span><span class="s">"Too many arguments!"</span><span class="p">)</span>
    <span class="p">}</span>

    <span class="k">let</span> <span class="n">endpoint</span> <span class="o">=</span> <span class="n">args</span><span class="nf">.last</span><span class="p">()</span><span class="nf">.unwrap</span><span class="p">();</span>

    <span class="k">let</span> <span class="n">res</span> <span class="o">=</span> <span class="nn">tokio</span><span class="p">::</span><span class="nn">runtime</span><span class="p">::</span><span class="nn">Builder</span><span class="p">::</span><span class="nf">new_current_thread</span><span class="p">()</span>
        <span class="nf">.enable_time</span><span class="p">()</span>
        <span class="nf">.enable_io</span><span class="p">()</span>
        <span class="nf">.build</span><span class="p">()</span>
        <span class="nf">.expect</span><span class="p">(</span><span class="s">"Could not build the runtime"</span><span class="p">)</span>
        <span class="nf">.block_on</span><span class="p">(</span><span class="nf">run</span><span class="p">(</span><span class="n">endpoint</span><span class="p">));</span>

    <span class="k">if</span> <span class="n">res</span><span class="nf">.is_ok</span><span class="p">()</span> <span class="p">{</span>
        <span class="nn">ExitCode</span><span class="p">::</span><span class="nf">from</span><span class="p">(</span><span class="mi">0</span><span class="p">)</span>
    <span class="p">}</span> <span class="k">else</span> <span class="p">{</span>
        <span class="nd">println!</span><span class="p">(</span><span class="s">"{}"</span><span class="p">,</span> <span class="n">res</span><span class="nf">.unwrap_err</span><span class="p">());</span>
        <span class="nn">ExitCode</span><span class="p">::</span><span class="nf">from</span><span class="p">(</span><span class="mi">1</span><span class="p">)</span>
    <span class="p">}</span>
<span class="p">}</span>

<span class="nd">#[cfg(test)]</span>
<span class="k">mod</span> <span class="n">tests</span> <span class="p">{</span>
    <span class="k">use</span> <span class="k">super</span><span class="p">::</span><span class="o">*</span><span class="p">;</span>

    <span class="nd">#[tokio::test]</span>
    <span class="k">async</span> <span class="k">fn</span> <span class="nf">can_reach_google</span><span class="p">()</span> <span class="p">{</span>
        <span class="k">let</span> <span class="n">res</span> <span class="o">=</span> <span class="nf">run</span><span class="p">(</span><span class="s">"http://google.com"</span><span class="p">)</span><span class="k">.await</span><span class="p">;</span>

        <span class="nd">assert!</span><span class="p">(</span><span class="n">res</span><span class="nf">.is_ok</span><span class="p">())</span>
    <span class="p">}</span>
<span class="p">}</span>
</code></pre></div></div> <p>This got a lot closer, but still had some key problems:</p> <ol> <li>TLS support was now mandatory. My friend didn’t need this, and some of the use cases that I would need something like <code class="language-plaintext highlighter-rouge">httpget</code> for also didn’t require TLS, so I wouldn’t want either of us to incur the cost of additional unused dependencies</li> <li>Since it now supported TLS, the binary was even larger: <code class="language-plaintext highlighter-rouge">4.07mb</code>, or roughly the size of the service container we wanted to use.</li> </ol> <p>For me, this meant that I should go back to the drawing board.</p> <h3 id="reassessing-dependencies">Reassessing Dependencies</h3> <p>A fundamental limit to the binary size came from the dependencies I was using. No matter what I did, I could only use <code class="language-plaintext highlighter-rouge">reqwest</code> if I also used <code class="language-plaintext highlighter-rouge">tokio</code>. This was far too excessive for my needs!</p> <p>After a bit more searching, I finally managed to find a package that aligned with my goals: <a href="https://crates.io/crates/minreq"><code class="language-plaintext highlighter-rouge">minreq</code></a>. Although it looks a LOT less used than <code class="language-plaintext highlighter-rouge">reqwest</code> - 122 stars, used by 585 projects, about 290k downloads at time of writing compared to 7.1k stars, used by 142k projects, about 48M downloads - it still does what I need it to do. In this case, I considered the benefits of using the most popular package to not outweigh the drawbacks of its bulk: the usecase does not support anything more than a bare-minimum library.</p> <p>I re-wrote the application to use the new client library instead, which supported minimal dependencies and no async. This means I can now forego having to bundle an async runtime, and making the final tool incredibly minimal.</p> <div class="language-rust highlighter-rouge"><div class="highlight"><pre class="highlight"><code><span class="k">use</span> <span class="nn">std</span><span class="p">::{</span><span class="n">env</span><span class="p">,</span> <span class="nn">process</span><span class="p">::</span><span class="n">ExitCode</span><span class="p">};</span>

<span class="nd">#[inline]</span>
<span class="k">fn</span> <span class="nf">run</span><span class="p">(</span><span class="n">endpoint</span><span class="p">:</span> <span class="o">&amp;</span><span class="nb">str</span><span class="p">)</span> <span class="k">-&gt;</span> <span class="nb">Result</span><span class="o">&lt;</span><span class="nn">minreq</span><span class="p">::</span><span class="n">Response</span><span class="p">,</span> <span class="nn">minreq</span><span class="p">::</span><span class="n">Error</span><span class="o">&gt;</span> <span class="p">{</span>
    <span class="nn">minreq</span><span class="p">::</span><span class="nf">get</span><span class="p">(</span><span class="n">endpoint</span><span class="p">)</span><span class="nf">.send</span><span class="p">()</span>
<span class="p">}</span>

<span class="k">fn</span> <span class="nf">main</span><span class="p">()</span> <span class="k">-&gt;</span> <span class="n">ExitCode</span> <span class="p">{</span>
    <span class="k">let</span> <span class="n">args</span><span class="p">:</span> <span class="nb">Vec</span><span class="o">&lt;</span><span class="nb">String</span><span class="o">&gt;</span> <span class="o">=</span> <span class="nn">env</span><span class="p">::</span><span class="nf">args</span><span class="p">()</span><span class="nf">.collect</span><span class="p">();</span>

    <span class="k">if</span> <span class="n">args</span><span class="nf">.len</span><span class="p">()</span> <span class="o">&gt;</span> <span class="mi">2</span> <span class="p">{</span>
        <span class="nd">panic!</span><span class="p">(</span><span class="s">"Too many arguments!"</span><span class="p">)</span>
    <span class="p">}</span>

    <span class="k">let</span> <span class="n">endpoint</span> <span class="o">=</span> <span class="n">args</span><span class="nf">.last</span><span class="p">()</span><span class="nf">.unwrap</span><span class="p">();</span>

    <span class="k">let</span> <span class="n">res</span> <span class="o">=</span> <span class="nf">run</span><span class="p">(</span><span class="n">endpoint</span><span class="p">);</span>

    <span class="k">if</span> <span class="n">res</span><span class="nf">.is_err</span><span class="p">()</span> <span class="p">{</span>
        <span class="nd">println!</span><span class="p">(</span><span class="s">"{}"</span><span class="p">,</span> <span class="n">res</span><span class="nf">.unwrap_err</span><span class="p">());</span>
        <span class="k">return</span> <span class="nn">ExitCode</span><span class="p">::</span><span class="nf">from</span><span class="p">(</span><span class="mi">1</span><span class="p">);</span>
    <span class="p">}</span>

    <span class="k">let</span> <span class="n">code</span> <span class="o">=</span> <span class="n">res</span><span class="nf">.unwrap</span><span class="p">()</span><span class="py">.status_code</span><span class="p">;</span>

    <span class="k">if</span> <span class="n">code</span> <span class="o">&gt;</span> <span class="mi">299</span> <span class="p">{</span>
        <span class="nd">println!</span><span class="p">(</span><span class="s">"Received status code {}"</span><span class="p">,</span> <span class="n">code</span><span class="p">);</span>
        <span class="k">return</span> <span class="nn">ExitCode</span><span class="p">::</span><span class="nf">from</span><span class="p">(</span><span class="mi">1</span><span class="p">);</span>
    <span class="p">}</span>

    <span class="nn">ExitCode</span><span class="p">::</span><span class="nf">from</span><span class="p">(</span><span class="mi">0</span><span class="p">)</span>
<span class="p">}</span>

<span class="nd">#[cfg(test)]</span>
<span class="k">mod</span> <span class="n">tests</span> <span class="p">{</span>
    <span class="k">use</span> <span class="k">super</span><span class="p">::</span><span class="o">*</span><span class="p">;</span>

    <span class="nd">#[test]</span>
    <span class="k">fn</span> <span class="nf">can_reach_google</span><span class="p">()</span> <span class="p">{</span>
        <span class="k">let</span> <span class="n">res</span> <span class="o">=</span> <span class="nf">run</span><span class="p">(</span><span class="s">"http://google.com"</span><span class="p">);</span>

        <span class="nd">assert!</span><span class="p">(</span><span class="n">res</span><span class="nf">.is_ok</span><span class="p">())</span>
    <span class="p">}</span>

    <span class="nd">#[test]</span>
    <span class="k">fn</span> <span class="nf">cant_reach_nonsense</span><span class="p">()</span> <span class="p">{</span>
        <span class="k">let</span> <span class="n">res</span> <span class="o">=</span> <span class="nf">run</span><span class="p">(</span><span class="s">"http://asdqeqweqweqweqwe.local/qweqweqweqwewqe"</span><span class="p">);</span>

        <span class="nd">assert!</span><span class="p">(</span><span class="n">res</span><span class="nf">.is_err</span><span class="p">())</span>
    <span class="p">}</span>
<span class="p">}</span>
</code></pre></div></div> <p>Lastly, I needed to resolve the TLS bundling problem. For that, I ended up learning that you can use features in your own crate to enable features in a dependent crate from reading the <a href="https://doc.rust-lang.org/cargo/reference/features.html#dependency-features">Cargo Book section on features</a>. Finally, I updated the pipelines to produce multiple binaries so that users could opt-in to TLS support, or use the regular binary for most condensed but http-only. With that, I released <a href="https://github.com/cryptaliagy/httpget/releases/tag/0.1.7"><code class="language-plaintext highlighter-rouge">httpget v0.1.7</code></a>.</p> <h3 id="final-review">Final Review</h3> <p>Let’s look over the requirements list and see where we left off one more time:</p> <table> <thead> <tr> <th>P0 (main priorities)</th> <th>P1 (key, but less important)</th> <th>P2 (nice-to-haves)</th> </tr> </thead> <tbody> <tr> <td>HTTP GET requests</td> <td>610 kb binary</td> <td>Automatic Github publishing</td> </tr> <tr> <td>On success, 0 exit code</td> <td>Minimal library, fast language</td> <td>Opt-in TLS support (1.62 mb binary, <code class="language-plaintext highlighter-rouge">rustls</code>)</td> </tr> <tr> <td>On failure, 1 exit code</td> <td>Easy CLI-ish</td> <td>Smaller than <code class="language-plaintext highlighter-rouge">wget</code></td> </tr> <tr> <td>Statically linked</td> <td> </td> <td> </td> </tr> </tbody> </table> <p>With this latest version of <code class="language-plaintext highlighter-rouge">httpget</code>, the overall binary size is laughably small, making it a reasonably negligible footprint on even the incredibly small service image we were working from. It required only 8 dependencies total to compile with no TLS support, and 25 to include <code class="language-plaintext highlighter-rouge">rustls</code> TLS.</p> <p>From the final binary, my friend was able to mount it to his container as a volume in Docker Compose, and then add a healthcheck as he originally intended. This meant he could still leverage the upstream image publishing, but also monitor container health.</p> <p>As a last note on binary size, <code class="language-plaintext highlighter-rouge">610kb</code> is <em>very</em> compact. For comparison, a blank “Hello, World!” application compiled with the same target and stripped in the same way is around <code class="language-plaintext highlighter-rouge">400kb</code>. It would be incredibly difficult to get any smaller than that binary size without trying to move to using <code class="language-plaintext highlighter-rouge">#[no_std]</code>.</p> <h2 id="what-did-i-learn">What Did I Learn?</h2> <p>As part of this work, I think the most critical (technical) knowledge gain was in how to more effectively use Cargo features. My P2-2 requirement for TLS to be optional could not have been enabled in any other way (that I know of) and it was originally frustrating to work with.</p> <p>I also learned quite a bit about properly gathering requirements, and double checking with the “client” (i.e. my friend). If I hadn’t been a bit more obsessive over the image size, I probably might not have noticed that I had a P0 that was incorrectly formed.</p> <p>It was also interesting to see how different targets worked to produce different binary sizes, and what dependencies I could use (or alternatively, that I couldn’t) with my P0 requirement of static linking. For example, I tried to use OpenSSL as the TLS provider at first, but couldn’t figure out a way to get it to link properly, so I gave up in the end and called it a “later problem”.</p> <p>Finally, I learned more about how binaries get linked, and what that means. To benchmark the existing web clients, I had to figure out how to find the libraries they were linked against so I could get the library sizes, which was new information.</p> <h2 id="future-work--opportunities-for-improvement">Future Work / Opportunities for Improvement</h2> <ol> <li>Enabling additional features for different TLS providers (i.e. OpenSSL)</li> <li>Additional documentation of the package itself</li> <li>Allowing <code class="language-plaintext highlighter-rouge">httpget</code> to receive a sequence of URLs, and querying each one, returning 0 if all of the requests succeed and 1 otherwise. This could be useful if the health of a service cannot be determined from a single route</li> <li>Using features and conditional compilation to let users choose the HTTP client at compile-time. This could allow someone a little more hesitant to use a less-popular library to still opt for using <code class="language-plaintext highlighter-rouge">reqwest</code> if they want to.</li> </ol>]]></content><author><name>Natalia Maximo</name></author><category term="Project Writeups"/><category term="development"/><category term="docker"/><category term="healthcheck"/><category term="infrastructure"/><category term="rust"/><category term="walkthrough"/><category term="containers"/><summary type="html"><![CDATA[]]></summary></entry><entry><title type="html">Running Automated Security Scans with Github Action</title><link href="https://natalia.dev/blog/2023/03/automated-security-scanning/" rel="alternate" type="text/html" title="Running Automated Security Scans with Github Action"/><published>2023-03-09T15:00:00+00:00</published><updated>2023-03-09T15:00:00+00:00</updated><id>https://natalia.dev/blog/2023/03/automated-security-scanning</id><content type="html" xml:base="https://natalia.dev/blog/2023/03/automated-security-scanning/"><![CDATA[<p>When I started in computer science, one thing that fascinated me about security is that “secure” is not really an end-state, but a process. There’s an inherent asymmetry in this industry: to guard against attacks you must prevent all possible avenues of attack, but to successfully exploit an application you only need to find one way in. Any non-trivial application left to collect dust will eventually become insecure as we learn about new and exciting ways in which people can exploit.</p> <p>If you’re a service team, these concerns might not be front of mind. Investing in security tooling and processes takes away time from being able to develop new features and fix existing bugs and maybe, just maybe, pay back some of that tech debt. Dependency updates need to be tested to prevent additional bugs, taking away even more of the critical resource of time. With all of that in mind, is it so bad to let a few versions go by?</p> <p>As it turns out, vulnerability patching is no joke: the Canadian Centre for Cyber Security ranks patching applications and operating systems as <a href="https://www.cyber.gc.ca/en/guidance/top-10-it-security-action-items-no2-patch-operating-systems-and-applications-itsm10096">one of the top 10 security actions to take</a>, placing it at #2. When you consider that <a href="https://www.comparitech.com/blog/information-security/cybersecurity-vulnerability-statistics/">75% of attacks in 2020 used vulnerabilities known for at least 2 years</a>, it becomes even more critical to keep software and dependencies up-to-date.</p> <p>In this post I will go over some tools that you can use to scan dependencies and containers for vulnerabilities. We will also use Github Actions to automate the use of these tools to give us regular updates on the status of a service’s container image.</p> <h2 id="preliminaries">Preliminaries</h2> <p>If you are familiar with software development and containers as a whole, you can skip this section.</p> <h3 id="general-concepts">General Concepts</h3> <ul> <li>A <a href="https://csrc.nist.gov/glossary/term/software_vulnerability"><strong>software vulnerability</strong></a> is a problem in a software that leaves it exposed to potential attacks.</li> <li>A <strong>Continuous Integration / Continuous Deployment</strong> (CI/CD) system is a system that lets you run automated testing, building, and deploying of applications</li> <li><strong>Github Actions</strong> is a CI/CD platform integrated into <a href="https://github.com">GitHub</a></li> <li>A <strong>pipeline</strong> is a specific definition inside your CI/CD platform. It can be used to build, test, and release software, among other things. In Github Actions, a pipeline is synonymous to a <strong>workflow</strong></li> <li>A <strong>branch</strong> is a concept related to the version control system called <strong>git</strong>. Usually, service deployments are done from the <strong>main</strong> branch, usually called (appropriately) <code class="language-plaintext highlighter-rouge">main</code>.</li> <li>A <strong>commit</strong> is a <em>specific point</em> in a branch. This effectively acts as a snapshot of your code, at a specific branch, at a specific moment in time.</li> </ul> <h3 id="containers">Containers</h3> <p>I assume for this post some level of familiarity with container tools such as Docker. Below is a list of concepts that you need to know:</p> <ul> <li>A <a href="https://www.docker.com/resources/what-container/"><strong>container</strong></a> is a way to package software and its dependencies to help it be more portable</li> <li><a href="https://docker.com">Docker</a> is a tool to let you build and run containers</li> <li>An <strong>image</strong> is the immutable definition of the container. <a href="https://phoenixnap.com/kb/docker-image-vs-container">You can think of them as a template</a>.</li> <li>An image has some <strong>base image</strong>, which usually has some tools and software installed on it. Unless you are building an image from <code class="language-plaintext highlighter-rouge">scratch</code>, the base image you use will have been published by someone. An example of this is <code class="language-plaintext highlighter-rouge">alpine:latest</code>, or <code class="language-plaintext highlighter-rouge">rust:1.67</code>.</li> <li>An image <strong>tag</strong> is some semantic name given to a specific <em>version</em> of the image. Tags are not immutable, meaning the image that is associated with a specific tag <em>can change</em>.</li> <li>A <strong>container registry</strong> allows you to upload container images, which can then be distributed. Github’s integrated container registry is called <strong>Github Packages</strong>.</li> <li>A container image is “uniquely” identified by its <a href="https://en.wikipedia.org/wiki/Hash_function#Overview"><strong>hash</strong></a>. This is done by a specific of a version called the <a href="https://en.wikipedia.org/wiki/Secure_Hash_Algorithms">Secure Hash Algorithm</a>, or SHA</li> </ul> <h3 id="required-software">Required Software</h3> <p>In this post I will assume you have Docker installed. I also mention Rust tooling for vulnerability scanning, but no practical example is done.</p> <p>You should be familiar with how to pull an image from a registry if you would like to follow along.</p> <h2 id="dependency-scanning">Dependency Scanning</h2> <p>A key benefit of having security be so front-of-mind in modern development is that there has been a lot of tooling developed specifically for improving security of applications. In particular, most languages have some sort of dependency scanning tool that compares your project’s dependencies against a list of known-vulnerable packages in your ecosystem.</p> <p>For Rust, one such tool is <a href="https://github.com/RustSec/rustsec/tree/main/cargo-audit">cargo-audit</a>, which uses the <a href="https://github.com/RustSec/advisory-db/">Rust Advisory Database</a> to check for vulnerabilities. It integrates very nicely with <code class="language-plaintext highlighter-rouge">cargo</code>, the Rust package manager.</p> <p>To install, run <code class="language-plaintext highlighter-rouge">cargo install cargo-audit</code>, and run a check with <code class="language-plaintext highlighter-rouge">cargo audit</code>. You can also check additional options for how to customize your scan a little more granularly.</p> <h2 id="container-scanning-with-trivy">Container Scanning with Trivy</h2> <p>You might assume that code dependencies are the only thing you have to worry about scanning, but sadly in the world of containers this isn’t really true.</p> <p>Most base images available are based off of some operating system, and give you many of the same tools. For example, by using the <code class="language-plaintext highlighter-rouge">ubuntu:latest</code> image, you have access to a whole <a href="https://en.wikipedia.org/wiki/List_of_GNU_Core_Utilities_commands">suite of tools</a>. These are not dependencies that you explicitly opted-in to, but ones that came bundled in.</p> <p>Beyond that, if you use a language that requires an interpreter (like Python or Javascript) or some additional runtime engine (like Java or C#), these will also have their own set of dependencies that they need to run. This introduces additional avenues for vulnerabilities that would not be caught by a dependency scanner.</p> <p>Thankfully, container scanning tools are also fairly prevalent. One common one is a tool called <a href="https://trivy.dev/">trivy</a>, which lets you (among other things) scan container images for vulnerable packages, tools, libraries, etc.</p> <h3 id="manually-scanning-images">Manually Scanning Images</h3> <p>First, you should <a href="https://github.com/aquasecurity/trivy#get-trivy">install Trivy</a> however makes the most sense for your system and usecase. I will assume that however you’ve installed it, you can access it from your command-line with the <code class="language-plaintext highlighter-rouge">trivy</code> command.</p> <p>Next, let’s pull an image with some known vulnerabilities:</p> <div class="language-bash highlighter-rouge"><div class="highlight"><pre class="highlight"><code>docker pull python:3.7-slim-stretch
</code></pre></div></div> <p>Next, let’s run a trivy scan:</p> <div class="language-bash highlighter-rouge"><div class="highlight"><pre class="highlight"><code>trivy image python:3.7-slim-stretch
</code></pre></div></div> <p>You should see a table output with lots of vulnerabilities listed (by code), the package that is vulnerable, it’s severity rating, what version you have installed, and the minimum version needed to fix the vulnerability.</p> <p>Now, let’s run a scan on an image that has no vulnerabilities (at the time of writing). Note, there’s a chance that when you are reading this, the image might be vulnerable. I’ve picked Alpine for this purpose because their vulnerability patching tends to be very timely.</p> <div class="language-bash highlighter-rouge"><div class="highlight"><pre class="highlight"><code>docker pull alpine:latest
trivy image alpine:latest
</code></pre></div></div> <h2 id="running-regular-scans">Running Regular Scans</h2> <p>Now that we’re able to scan our dependencies and containers for known vulnerabilities, it’s time to add some automation. While it’s lovely to be able to do the process manually, leaving this task for developers will add overhead that you just don’t need, or it will mean that it doesn’t get done.</p> <p>Besides, I’m very <a href="https://thethreevirtues.com/">lazy</a>. If a computer can do something for me instead, that is preferable.</p> <p>A few things to keep in mind as we start this process:</p> <ul> <li>Regular scanning is nice, but you also need to have a plan for when vulnerabilities are found. <ul> <li>It’s possible for a dependency to release a fix for a vulnerability alongside a breaking change. Good testing will allow you to catch this and address necessary changes.</li> <li>If you prevent deployments from happening when the images fail a vulnerability scan, you could inadvertently prevent critical fixes from being deployed in your own service. Have a plan in mind for how to deploy hotfixes even if there is a dependency you can’t upgrade yet</li> </ul> </li> <li>Not all vulnerabilities are created equal, but the security team won’t love you if you point that out <ul> <li>Especially as teams and companies grow, it’s harder and harder to ensure that whomever is in charge of security is aware of all the required context to accept the risk of a specific vulnerability.</li> <li>The easiest way to ensure that your software isn’t vulnerable even by transitivity is to not let any part of it have an unpatched known vulnerability.</li> </ul> </li> <li>Your release cycle needs to be considered when setting the frequency and type of scans</li> </ul> <p>For web services I’ve written as personal projects, I like to do three types of scans as part of my nightly scans:</p> <ol> <li>Scan the dependencies to see if anything needs to be updated</li> <li>Scan the containers we most recently deployed (the <code class="language-plaintext highlighter-rouge">latest</code> tag, usually). These should be the containers that are running in production.</li> <li>Build new release images at the latest commit of the <code class="language-plaintext highlighter-rouge">main</code> branch, and then scan those images.</li> </ol> <p>This is by no means an exhaustive list (we could, for example, scan the files for secrets), but is a very good foundation.</p> <h3 id="a-note-on-published-vs-built-containers">A Note On Published vs Built Containers</h3> <p>It’s quite common for the most recent commit to the <code class="language-plaintext highlighter-rouge">main</code> branch to also be what was most recently deployed. You might be wondering, then: why do both scans?</p> <p>This is when release cycle comes into play- Not only your own release cycle, but the release cycle of whatever container dependencies you use in your project!</p> <p>It’s reasonably common to use version tags that get updated, such as <code class="language-plaintext highlighter-rouge">rust:1.67</code> (which gets updated on patch versions), as well as the use of <code class="language-plaintext highlighter-rouge">latest</code> tags. If that is the case in your service, it is possible to have the most recently deployed version be flagged as vulnerable while the most recently built container is not.</p> <p>If you use tags that don’t tend to change (like <code class="language-plaintext highlighter-rouge">rust:1.67.1</code>) or use SHA hashes for your containers, doing both scans won’t give you anything different. In those cases, you’ll need to upgrade the dependency manually.</p> <h3 id="automating-the-scans">Automating the Scans</h3> <p>Since I use Github as my primary code storage, I tend to use Github Actions for automation. Thankfully, it supports running on a schedule with a similar syntax to <a href="https://en.wikipedia.org/wiki/Cron">cron</a>, which we can leverage.</p> <p>Below is the workflow file definition used for my <a href="https://github.com/cryptaliagy/websvc-rs">websvc-rs</a> repository template, which covers all three of the discussed scans. I have annotated it with additional explanations of what everything each job does.</p> <p>It’s important to keep in mind that, if your service gets released in multiple ways per version, you should scan all of them. In this example, <code class="language-plaintext highlighter-rouge">websvc-rs</code> releases 4 images for every version, broken down into:</p> <ul> <li>One version compiled with <code class="language-plaintext highlighter-rouge">musl</code> that is based off of <code class="language-plaintext highlighter-rouge">scratch</code>, and includes nothing except the service and a tool to check that the service is healthy, tagged <code class="language-plaintext highlighter-rouge">latest</code></li> <li>One version compiled with <code class="language-plaintext highlighter-rouge">musl</code> that is based off of <code class="language-plaintext highlighter-rouge">alpine:latest</code> that includes additional tools on top of what I’ve built (i.e. a shell, a package manager, etc), tagged <code class="language-plaintext highlighter-rouge">debug</code></li> <li>One version compiled with <code class="language-plaintext highlighter-rouge">glibc</code> that is based off of <code class="language-plaintext highlighter-rouge">scratch</code>, tagged <code class="language-plaintext highlighter-rouge">latest-gnu</code></li> <li>One version compiled with <code class="language-plaintext highlighter-rouge">glibc</code> that is based off of <code class="language-plaintext highlighter-rouge">alpine:latest</code>, tagged <code class="language-plaintext highlighter-rouge">debug-gnu</code></li> </ul> <p>Each of these versions should be scanned.</p> <div class="language-yaml highlighter-rouge"><div class="highlight"><pre class="highlight"><code>
<span class="c1"># .github/workflows/nightly-scan.yml</span>
<span class="na">name</span><span class="pi">:</span> <span class="s">nightly-scan</span>

<span class="na">on</span><span class="pi">:</span>
  <span class="na">schedule</span><span class="pi">:</span>
    <span class="c1"># 7 AM UTC every day. Roughly translates to 2 AM in the east coast</span>
    <span class="pi">-</span> <span class="na">cron</span><span class="pi">:</span> <span class="s2">"</span><span class="s">0</span><span class="nv"> </span><span class="s">7</span><span class="nv"> </span><span class="s">*</span><span class="nv"> </span><span class="s">*</span><span class="nv"> </span><span class="s">*"</span>
  <span class="c1"># Allows the workflow to be manually triggered</span>
  <span class="na">workflow_dispatch</span><span class="pi">:</span>

<span class="na">env</span><span class="pi">:</span>
  <span class="c1"># Github container registry's domain</span>
  <span class="na">REGISTRY</span><span class="pi">:</span> <span class="s">ghcr.io</span>
  <span class="c1"># The name of the image. I always use the repository</span>
  <span class="c1"># name when only publishing one container image</span>
  <span class="na">IMAGE_NAME</span><span class="pi">:</span> <span class="s">${{ github.repository }}</span>

<span class="na">jobs</span><span class="pi">:</span>
  <span class="c1"># Job to run the audit scan for `cargo` dependencies</span>
  <span class="na">cargo-audit</span><span class="pi">:</span>
    <span class="na">runs-on</span><span class="pi">:</span> <span class="s">ubuntu-latest</span>
    <span class="na">steps</span><span class="pi">:</span>
      <span class="pi">-</span> <span class="na">name</span><span class="pi">:</span> <span class="s">Checkout repository</span>
        <span class="na">uses</span><span class="pi">:</span> <span class="s">actions/checkout@v3</span>

      <span class="pi">-</span> <span class="na">name</span><span class="pi">:</span> <span class="s">Install rust tool chain</span>
        <span class="na">uses</span><span class="pi">:</span> <span class="s">dtolnay/rust-toolchain@master</span>
        <span class="na">with</span><span class="pi">:</span>
          <span class="na">toolchain</span><span class="pi">:</span> <span class="s">stable</span>
          <span class="na">components</span><span class="pi">:</span> <span class="s">rustfmt, clippy</span>

      <span class="pi">-</span> <span class="na">name</span><span class="pi">:</span> <span class="s">Run the security scanner</span>
        <span class="na">run</span><span class="pi">:</span> <span class="s">cargo audit</span>

  <span class="c1"># Job to build an image from the latest commit &amp;</span>
  <span class="c1"># scan the resulting image. This is because the</span>
  <span class="c1"># service uses `alpine:latest` for debug containers.</span>
  <span class="c1">#</span>
  <span class="c1"># Prod targets are still scanned despite being based</span>
  <span class="c1"># off of `scratch` in case the basis changes. For example,</span>
  <span class="c1"># if instead of `scratch` I ended up needing to use one of</span>
  <span class="c1"># the distroless images, they will contain some dependencies</span>
  <span class="na">sha-scan</span><span class="pi">:</span>
    <span class="na">runs-on</span><span class="pi">:</span> <span class="s">ubuntu-latest</span>
    <span class="na">strategy</span><span class="pi">:</span>
      <span class="na">fail-fast</span><span class="pi">:</span> <span class="kc">false</span>
      <span class="na">matrix</span><span class="pi">:</span>
        <span class="na">target</span><span class="pi">:</span>
          <span class="pi">-</span> <span class="s">prod</span>
          <span class="pi">-</span> <span class="s">debug</span>
          <span class="pi">-</span> <span class="s">prod-gnu</span>
          <span class="pi">-</span> <span class="s">debug-gnu</span>
    <span class="na">steps</span><span class="pi">:</span>
      <span class="pi">-</span> <span class="na">name</span><span class="pi">:</span> <span class="s">Checkout repository</span>
        <span class="na">uses</span><span class="pi">:</span> <span class="s">actions/checkout@v3</span>

      <span class="pi">-</span> <span class="na">name</span><span class="pi">:</span> <span class="s">Build the docker container</span>
        <span class="na">run</span><span class="pi">:</span> <span class="pi">|</span>
          <span class="s">docker build -t ${{ env.REGISTRY }}/${{ env.IMAGE_NAME }}:${{ github.sha }} \</span>
            <span class="s">--target ${{ matrix.target }} \</span>
            <span class="s">.</span>
      <span class="pi">-</span> <span class="na">name</span><span class="pi">:</span> <span class="s">Run Trivy vulnerability scanner</span>
        <span class="na">uses</span><span class="pi">:</span> <span class="s">aquasecurity/trivy-action@master</span>
        <span class="na">with</span><span class="pi">:</span>
          <span class="na">image-ref</span><span class="pi">:</span> <span class="s2">"</span><span class="s">${{</span><span class="nv"> </span><span class="s">env.REGISTRY</span><span class="nv"> </span><span class="s">}}/${{</span><span class="nv"> </span><span class="s">env.IMAGE_NAME</span><span class="nv"> </span><span class="s">}}:${{</span><span class="nv"> </span><span class="s">github.sha</span><span class="nv"> </span><span class="s">}}"</span>
          <span class="na">format</span><span class="pi">:</span> <span class="s2">"</span><span class="s">table"</span>
          <span class="na">exit-code</span><span class="pi">:</span> <span class="s2">"</span><span class="s">1"</span>
          <span class="na">ignore-unfixed</span><span class="pi">:</span> <span class="kc">true</span>

  <span class="c1"># Pulls from Github Packages each of the 4 images that</span>
  <span class="c1"># are released, and scans them.</span>
  <span class="na">registry-image-scan</span><span class="pi">:</span>
    <span class="na">runs-on</span><span class="pi">:</span> <span class="s">ubuntu-latest</span>
    <span class="na">strategy</span><span class="pi">:</span>
      <span class="na">fail-fast</span><span class="pi">:</span> <span class="kc">false</span>
      <span class="na">matrix</span><span class="pi">:</span>
        <span class="na">tag</span><span class="pi">:</span>
          <span class="pi">-</span> <span class="s">latest</span>
          <span class="pi">-</span> <span class="s">latest-gnu</span>
          <span class="pi">-</span> <span class="s">debug</span>
          <span class="pi">-</span> <span class="s">debug-gnu</span>
    <span class="na">steps</span><span class="pi">:</span>
      <span class="pi">-</span> <span class="na">name</span><span class="pi">:</span> <span class="s">Pull the docker image to scan</span>
        <span class="na">run</span><span class="pi">:</span> <span class="s">docker pull ${{ env.REGISTRY }}/${{ env.IMAGE_NAME }}:${{ matrix.tag }}</span>

      <span class="pi">-</span> <span class="na">name</span><span class="pi">:</span> <span class="s">Run Trivy vulnerability scanner</span>
        <span class="na">uses</span><span class="pi">:</span> <span class="s">aquasecurity/trivy-action@master</span>
        <span class="na">with</span><span class="pi">:</span>
          <span class="na">image-ref</span><span class="pi">:</span> <span class="s2">"</span><span class="s">${{</span><span class="nv"> </span><span class="s">env.REGISTRY</span><span class="nv"> </span><span class="s">}}/${{</span><span class="nv"> </span><span class="s">env.IMAGE_NAME</span><span class="nv"> </span><span class="s">}}:${{</span><span class="nv"> </span><span class="s">matrix.tag</span><span class="nv"> </span><span class="s">}}"</span>
          <span class="na">format</span><span class="pi">:</span> <span class="s2">"</span><span class="s">table"</span>
          <span class="na">exit-code</span><span class="pi">:</span> <span class="s2">"</span><span class="s">1"</span>
          <span class="na">ignore-unfixed</span><span class="pi">:</span> <span class="kc">true</span>

</code></pre></div></div> <p>Now, any time this workflow fails, I will get a Github notification and be able to see what went wrong and, potentially, run a new deployment to fix it!</p> <h4 id="why-scan-scratch-images">Why Scan <code class="language-plaintext highlighter-rouge">scratch</code> Images?</h4> <p>You might be wondering why I bother scanning the <code class="language-plaintext highlighter-rouge">latest</code> and <code class="language-plaintext highlighter-rouge">latest-gnu</code> images. After all, if they only have the service and the health check, won’t they always come back clean when our service doesn’t have a vulnerability itself?</p> <p>Yes, that is exactly correct. However, this assumes that these images are currently based off of <code class="language-plaintext highlighter-rouge">scratch</code> and <em>will always</em> be based off of <code class="language-plaintext highlighter-rouge">scratch</code>. Similarly, it assumes that nothing else will <em>ever</em> get added to the image.</p> <p>If any of these assumptions change down the line, we would have to update our nightly scanner, which means we will also have to <em>remember</em> to update our nightly scanner. However, if we scan them (even when we don’t need to), we are covered when our initial assumptions no longer hold.</p> <h2 id="wrapping-up">Wrapping Up</h2> <p>In this post we talked about the importance of security scanning, and gave context to the different methods of scanning. We covered an example of scanning two real containers for vulnerabilities, and set up a Github Actions workflow to run regularly-scheduled scans.</p> <h2 id="questions-to-reflect-on">Questions to Reflect On</h2> <ol> <li>Since we can use a workflow file to deploy our application, we could have this nightly scan deploy a new version from the newly-built containers if the existing ones are vulnerable and the new ones are not. What are some potential benefits to doing that? What are some potential drawbacks?</li> <li>In this example, I configure Trivy to ignore unfixed issues. What are some benefits of doing this? What are the drawbacks?</li> <li>In this post, we only covered one specific dependency scanning tool, and only for one programming language. If Rust is not your primary language, what dependency scanning tool is the most popular one for your language of choice?</li> <li>If Trivy can scan so many targets, including filesystems and git repositories, why did we go over how to run a dependency scan using <code class="language-plaintext highlighter-rouge">cargo-audit</code>? Are there (security or otherwise) benefits to using it instead of Trivy?</li> </ol>]]></content><author><name>Natalia Maximo</name></author><category term="DevSecOps"/><category term="docker"/><category term="containers"/><category term="devops"/><category term="infrastructure"/><category term="devsecops"/><category term="security"/><category term="scanning"/><category term="trivy"/><category term="rust"/><summary type="html"><![CDATA[When I started in computer science, one thing that fascinated me about security is that “secure” is not really an end-state, but a process. There’s an inherent asymmetry in this industry: to guard against attacks you must prevent all possible avenues of attack, but to successfully exploit an application you only need to find one way in. Any non-trivial application left to collect dust will eventually become insecure as we learn about new and exciting ways in which people can exploit.]]></summary></entry><entry><title type="html">Welcome and Info</title><link href="https://natalia.dev/blog/2023/03/welcome/" rel="alternate" type="text/html" title="Welcome and Info"/><published>2023-03-05T16:00:00+00:00</published><updated>2023-03-05T16:00:00+00:00</updated><id>https://natalia.dev/blog/2023/03/welcome</id><content type="html" xml:base="https://natalia.dev/blog/2023/03/welcome/"><![CDATA[<p>Hello, and welcome to my blog! If you have not done so yet, I encourage you to read my <a href="/">about</a> page to learn a little bit more about who I am as a person.</p> <p>In this post, I will be going over some house-keeping content. If we were to pretend that my blog is a class, you could consider this post to be its syllabus: this covers the general topics I try to cover, how I structure different material, what assumptions I make about the reader, etc.</p> <h2 id="content">Content</h2> <p>Ideally, I would like to do series of posts that cover related topics. There are a number that I am currently entertaining (some of which I have already decided to do), including:</p> <ul> <li>Cryptography primer <ul> <li>Cover math concepts used in cryptography</li> <li>Cover how these concepts are actually used</li> <li>Implementing the math / cryptography concepts discussed</li> </ul> </li> <li>Creating and operating a <code class="language-plaintext highlighter-rouge">k3s</code> cluster <ul> <li>How to bootstrap a cluster</li> <li>Setting up cluster storage</li> <li>Monitoring with <code class="language-plaintext highlighter-rouge">kube-prometheus-stack</code></li> <li>Deploying applications</li> <li>GitOps</li> </ul> </li> <li>Containers and You <ul> <li>Creating containers to use for development</li> <li>Production containers &amp; a minimized setup</li> <li>Security concepts in container technology</li> <li>Emerging / existing container technology</li> </ul> </li> <li>Bootstrapping a Rust-based web service</li> </ul> <p>If you are interested in my writing any other series in specific, I highly encourage you to <a href="mailto:iam@natalia.dev">reach out</a>! I would love to hear feedback (even if the feedback is negative), and would like to make content that is interesting to read. If you think I can cover anything in specific, or if you like my style of writing and want me to answer specific questions you may have, I would be glad to do so!</p> <p>I will also try to do one-offs that I think are interesting or relevant to current events; for instance, if any big attacks are made public or if there is relevant policy I’ve heard about that touches on my topics of interest.</p> <p>Finally, I will be trying to provide project writeups when I make new open-source projects that give a more narrative description of why the project was made, how it was made, what decisions went into it and why. I hope in doing so I can add a bit of clarity and context about my work.</p> <h2 id="frequency--structure">Frequency &amp; Structure</h2> <p>In general, I am hoping to make approximately 1-2 posts a week. Sometimes this might increase or decrease depending on additional circumstances: if an important new vulnerability is discovered, I might make an additional post even if I’ve already made 2, or if I am on vacation I might skip a week. I will try to post on the <a href="/news">news</a> if I know that will happen ahead of time.</p> <p>For post series, I will be releasing a first post that goes over the preliminaries of the series, including what I expect a reader to know ahead of time, what format the posts will have, and other specifics that can change series-by-series.</p> <p>For project writeups, I will be assuming a passing familiarity with the tools used, and will link to existing documentation for any dependencies and specifics that I use or encounter.</p> <p>Finally, for one-offs and current events, I will try to have a preface section with an overview of everything you need to know and links to appropriate resources for more information.</p> <h2 id="errata">Errata</h2> <p>If ever you find material in my posts that is incorrect, or there is a better way (i.e. a best practice I am not following), I highly encourage you to <a href="mailto:iam@natalia.dev">reach out by email</a> to let me know.</p>]]></content><author><name>Natalia Maximo</name></author><category term="Personal"/><category term="overview"/><category term="about"/><category term="personal"/><summary type="html"><![CDATA[Hello, and welcome to my blog! If you have not done so yet, I encourage you to read my about page to learn a little bit more about who I am as a person.]]></summary></entry><entry><title type="html">Removing Ads For Your Network with PiHole</title><link href="https://natalia.dev/2021/09/26/removing-ads-for-your-network-with-pihole/" rel="alternate" type="text/html" title="Removing Ads For Your Network with PiHole"/><published>2021-09-27T03:31:33+00:00</published><updated>2021-09-27T03:31:33+00:00</updated><id>https://natalia.dev/2021/09/26/removing-ads-for-your-network-with-pihole</id><content type="html" xml:base="https://natalia.dev/2021/09/26/removing-ads-for-your-network-with-pihole/"><![CDATA[<p></p> <p>In the last few guides, we have gone over <a rel="noreferrer noopener" href="https://natalia.dev/2021/09/23/setting-up-headless-raspberry-pi-with-raspberry-pi-os/" data-type="URL" data-id="https://natalia.dev/2021/09/23/setting-up-headless-raspberry-pi-with-raspberry-pi-os/" target="_blank">how to set up a new headless Raspberry Pi</a> with some sensible configurations, <a rel="noreferrer noopener" href="https://natalia.dev/2021/09/24/ssh-with-no-password-using-public-key-cryptography/" data-type="URL" data-id="https://natalia.dev/2021/09/24/ssh-with-no-password-using-public-key-cryptography/" target="_blank">how to connect over SSH without using a password</a> while ensuring only expected machines can connect, as well as <a rel="noreferrer noopener" href="https://natalia.dev/2021/09/25/ssh-multifactor-authentication-with-google-authenticator-and-yubikey/" data-type="URL" data-id="https://natalia.dev/2021/09/25/ssh-multifactor-authentication-with-google-authenticator-and-yubikey/" target="_blank">how to use multi-factor authentication over SSH</a> to add another layer of protection to our server. While these have all been good practices, we have not yet (at this point) actually used our Raspberry Pi for anything. Depending on where you've installed it your RasPi might be a fun conversational piece, but it would be a lot better if we could have it be working for us. Today, we'll be accomplishing that by adding <a rel="noreferrer noopener" href="https://pi-hole.net" data-type="URL" data-id="https://pi-hole.net" target="_blank">PiHole</a> to our Raspberry Pi as a DNS server, which will allow our entire network to benefit from their <a href="https://en.wikipedia.org/wiki/Domain_Name_System" data-type="URL" data-id="https://en.wikipedia.org/wiki/Domain_Name_System" target="_blank" rel="noreferrer noopener">DNS</a>-based ad-blocking.</p> <p></p> <p></p> <p>First, let's go over some key concepts of the tech we're going to be using.</p> <p></p> <p></p> <h2>What Is a DHCP Server?</h2> <p></p> <p></p> <p>Very briefly, a DHCP server is a bit of software that is able to make all the devices on a network play nicely together by giving each of them a unique identifier (their IP Address), letting them know what DNS server to use, and trying to ensure that no two machines on the network have the same address. DHCP servers remove the need for each machine to be manually configured by someone who knows the network landscape, and instead offloads that task to a computer.</p> <p></p> <p></p> <p>While most residential DHCP servers work entirely by dynamically allocating addresses to machines, they are also capable of providing <em>reservations</em>, which is when the DHCP server <em>reserves</em> an IP address for a specific machine. This is incredibly useful when you need to have a machine on your network that should always be given the same address because it needs to be predictably discovered by other machines. We see this often for network printers, servers, and other similar software.</p> <p></p> <p></p> <h2>What Is a DNS Server?</h2> <p></p> <p></p> <p>Whenever you click on a link or type a website's URL onto your browser's address bar there is a lot going on under the hood to bring you your content. While using the internet these days is pretty trivial, there are many systems in place that translate the experience from something that is easy for people to use (with words and text) to something that is easy for computers to operate on (broadly speaking, numbers). One of those systems is the <strong>D</strong>omain <strong>N</strong>ame <strong>S</strong>ervice, which lets us convert URLs – such as natalia.dev – into IP addresses – such as 162.241.253.207.</p> <p></p> <p></p> <p>Whenever you go to a website, your computer first makes a request to the DNS server that it is told to use by the DHCP server with the URL of the website. The DNS server then <em>resolves</em> the URL into an IP address, which your computer can then use as the <em>destination</em> on the <em>packet</em> that it sends.</p> <p></p> <p></p> <p>One simple way of thinking about it is that the DNS server is similar to an address book that can tell you your friend's postal code. You consult it before you send a letter to your friend so that you can give the proper information to the post office, which will then send your letter.</p> <p></p> <p></p> <h2>What Is PiHole?</h2> <p></p> <p></p> <p>At its core, PiHole is akin to a DNS server. You configure it to receive DNS requests on your network, and it will take them in and resolve them. However, it has a crucial additional feature: It contains a comprehensive blocklist that allows it to determine if it should resolve it properly, or drop the request. This, in turn, allows it to drop all DNS calls to places that are known for serving ads, malicious content, trackers, and the like.</p> <p></p> <p></p> <p>You might be thinking to yourself, "the internet is mostly free right now, isn't that powered by ads? Wouldn't it be a bad thing to block them?", and on some points you would be right. It is indeed true that much of the internet is able to sustain itself by ad-based revenue. However, this comes at a fairly substantial costs to users in that it exposes additional threats. There have been many recorded incidents of <a rel="noreferrer noopener" href="https://en.wikipedia.org/wiki/Malvertising" data-type="URL" data-id="https://en.wikipedia.org/wiki/Malvertising" target="_blank">using ads to spread malware</a>, and large companies that focus on generating ad revenue rely on using your data to generate comprehensive profiles on you to target you specifically for certain kinds of ads. There are several ethical and security implications to this that warrant a full discussion on another day.</p> <p></p> <p></p> <p>For today, however, we will be going through a way that we can try to minimize this as much as possible through PiHole.</p> <p></p> <p></p> <h2>Setting Up Your Network</h2> <p></p> <p></p> <p>The first thing we should do is to make sure that we have a DHCP reservation for our Raspberry Pi up now. I usually like to get this step out of the way first, because I don't want to forget it.</p> <p></p> <p></p> <p>Modern routers usually include a small HTTP server that allows you to manage it via a web interface, so we'll need to go on that to set up our DHCP reservation. My network's router is at address 192.168.0.1, so I can just punch that into my address bar to get the admin panel. Yours might be different, and you can consult <a href="https://www.lifewire.com/how-to-find-your-default-gateway-ip-address-2626072">this article by Lifewire</a> on how to find yours.</p> <p></p> <p></p> <div class="wp-block-image"> <figure class="aligncenter size-large is-resized"><img src="/assets/2021/09/Screen-Shot-2021-09-26-at-9.27.20-PM-1024x493.png" alt="" class="wp-image-216" width="655" height="315"/><br/> <figcaption>Admin Panel for my router. Note, on different routers the DHCP settings will be on different locations. Make sure that you can find your router's settings.</figcaption> </figure> </div> <p></p> <p></p> <p>Once you have that address, go to it and log in. If you have never logged in before, you might need to look up your router's default admin credentials are. I highly recommend changing the password if it is still the default one.</p> <p></p> <p></p> <p>After logging in, search for the DHCP settings. This might be under a different name, such as my own router which has it under "LAN Setup". Find the setting for "DHCP Reservation", and make one for your Raspberry Pi to maintain the same IP address.</p> <p></p> <p></p> <figure class="wp-block-image size-large"><img src="/assets/2021/09/Screen-Shot-2021-09-26-at-9.30.15-PM-1024x319.png" alt="" class="wp-image-217"/><br/> <figcaption>Reserving a client IP address for the Raspberry Pi</figcaption> </figure> <p></p> <p></p> <p>Once you have this reservation complete, save your configurations and close out of the admin panel. Now we're ready to start setting up our pihole.</p> <p></p> <p></p> <h2>Installing PiHole</h2> <p></p> <p></p> <p>It is broadly recommended that we always look at code we're downloading from the internet before we run it on our systems. So first, let's download the basic installer code with the following command:</p> <p></p> <p></p> <pre class="wp-block-code"><code>wget -O basic-install.sh https://install.pi-hole.net</code></pre> <p></p> <p></p> <div class="wp-block-image"> <figure class="aligncenter size-large is-resized"><img src="/assets/2021/09/Screen-Shot-2021-09-26-at-9.42.04-PM-1024x820.png" alt="" class="wp-image-218" width="543" height="434"/><br/> <figcaption>Downloading the pi-hole installer script</figcaption> </figure> </div> <p></p> <p></p> <p>We can then review that code by opening it up in <code>nano</code>, or using <code>less</code>, and review it to make sure it doesn't seem to be doing anything wrong. Once we've finished with that process, we can run the script with the following command:</p> <p></p> <p></p> <pre class="wp-block-code"><code>sudo bash basic-install.sh</code></pre> <p></p> <p></p> <p>This will start a series of checks and package installations. You will then have to go through some menus, and select which interface to use. Since I am using my Raspberry Pi connected to ethernet, I chose the <code>eth0</code> interface instead of the <code>wlan0</code>. If your interface names don't quite match, a good rule of thumb is that if it starts with <code>eth</code> it is most likely ethernet. If you're unsure, press 'Cancel' and figure out which interface you need to use.</p> <p></p> <p></p> <p>Eventually, you will be prompted with a screen notifying you that PiHole needs a static IP, and then finally a selection screen for what upstream DNS provider you would like to use.</p> <p></p> <p></p> <div class="wp-block-image"> <figure class="aligncenter size-large is-resized"><img src="/assets/2021/09/Screen-Shot-2021-09-26-at-10.01.28-PM-1024x818.png" alt="" class="wp-image-219" width="631" height="504"/><br/> <figcaption>Selection screen for the Upstream DNS Server</figcaption> </figure> </div> <p></p> <p></p> <p>Which server you pick ends up being a matter of personal preference, and there's quite a few available. Personally, I like to go with <a rel="noreferrer noopener" href="https://www.opendns.com" data-type="URL" data-id="https://www.opendns.com" target="_blank">OpenDNS</a>, which I believe is currently owned by CISCO, since they support DNSSEC and are broadly a security-minded company. You can choose whichever one you find most appropriate based on your own criteria.</p> <p></p> <p></p> <p>Afterwards, press <code>Enter</code> to accept, and leave the remainder of the settings as default until you reach the menu shown below:</p> <p></p> <p></p> <div class="wp-block-image"> <figure class="aligncenter size-large is-resized"><img src="/assets/2021/09/Screen-Shot-2021-09-26-at-10.11.18-PM-1024x819.png" alt="" class="wp-image-220" width="502" height="401"/><br/> <figcaption>The Privacy Mode selection menu</figcaption> </figure> </div> <p></p> <p></p> <p> You can read a little bit more about what each privacy mode is on <a rel="noreferrer noopener" href="https://docs.pi-hole.net/ftldns/privacylevels/" data-type="URL" data-id="https://docs.pi-hole.net/ftldns/privacylevels/" target="_blank">this link</a>. I recommend you pick the one most appropriate for your home use. I won't touch too much on the ethics of logging information of the devices of your home, but I would like to take a minute to at least recommend that if you live with other people, you should check in with them before storing their data. It might be more appropriate to hide some or all of the information that is logged.</p> <p></p> <p></p> <p>Once you have made your selection, the installer will continue setting up the config files and packages you need to run the software. Once you have completed the installation, it's time that we set up our DNS servers to point to our new PiHole!</p> <p></p> <p></p> <div class="wp-block-image"> <figure class="aligncenter size-large is-resized"><img src="/assets/2021/09/Screen-Shot-2021-09-26-at-10.18.19-PM-1024x816.png" alt="" class="wp-image-221" width="580" height="462"/><br/> <figcaption>The finishing screen for the PiHole installation. Pressing <code>Enter</code> on the <code>&lt;Ok&gt;</code> button will show you your terminal, which includes the default admin password.</figcaption> </figure> </div> <p></p> <p></p> <h2>Setting up DNS Server Locally</h2> <p></p> <p></p> <p>I'm a very big proponent of the idea that we should fail fast, fail often, and fail small. As such, before we set all of our devices to use our new PiHole, we should first make sure that it is actually working appropriately.</p> <p></p> <p></p> <p>You'll need to <a rel="noreferrer noopener" href="https://developers.google.com/speed/public-dns/docs/using" data-type="URL" data-id="https://developers.google.com/speed/public-dns/docs/using" target="_blank">change your DNS settings to point to the new PiHole</a>. Once that is done, try navigating to the admin panel at <a rel="noreferrer noopener" href="http://pi.hole/admin" target="_blank">http://pi.hole/admin</a>. If you see the PiHole dashboard, your installation should be working! Try navigating to a few sites, such as your email or a local news site, to confirm that everything still works appropriately.</p> <p></p> <p></p> <div class="wp-block-image"> <figure class="aligncenter size-large is-resized"><img src="/assets/2021/09/Screen-Shot-2021-09-26-at-10.24.03-PM-1024x556.png" alt="" class="wp-image-222" width="570" height="309"/><br/> <figcaption>PiHole Dashboard</figcaption> </figure> </div> <p></p> <p></p> <h2>Setting up PiHole as Default DNS Server</h2> <p></p> <p></p> <p>Once we have confirmation that our PiHole works, it's time to make sure that our router sets the PiHole as the default DNS server for the entire network. Log back in to your admin panel, and search for the DNS settings of your router. Search for your DNS settings, and set the default server to be your PiHole's address</p> <p></p> <p></p> <div class="wp-block-image"> <figure class="aligncenter size-large is-resized"><img src="/assets/2021/09/Screen-Shot-2021-09-26-at-10.27.39-PM-1024x561.png" alt="" class="wp-image-223" width="628" height="344"/><br/> <figcaption> Setting the PiHole as the default DNS. Note, since we always want the adblocking feature turned on, we don't want to offer a secondary DNS server.</figcaption> </figure> </div> <p></p> <p></p> <p>Once that is done, save your settings. If you are patient, now you can simply wait and whenever new devices connect (or old devices have their lease expire), you should have the PiHole be their DNS server. If you are like me and want to see the fruits of my labour kick in instantly, just restart your router. All devices will have to reacquire their lease, which will update the DNS setting for all devices immediately.</p> <p></p> <p></p> <h2>Using the PiHole as a DHCP Server</h2> <p></p> <p></p> <p>If you log in to the Admin Panel on the PiHole, you may have noticed that the clients are (at least for the most part) only shown by their IP address. This means that if an IP address changes, the logs cannot be properly attributed to a specific client, and the clients are not meaningfully described.</p> <p></p> <p></p> <p>As well, some routers, especially the ones that are provided by Internet Service Providers (ISPs), don't actually allow you to change your default DNS server. If that is the case, you won't actually be able to use PiHole automatically without other changes.</p> <p></p> <p></p> <p>In all of these cases, it might be wiser to use the PiHole itself as the DHCP server for your network.</p> <p></p> <p></p> <p>To start, go on your PiHole admin panel, navigate to Settings and DHCP settings. Click the checkbox to enable using the Pi as a DHCP server, and set the IP address range to appropriate values. Then, press "Save", and go to your router's admin panel and disable the DHCP functionality on the router. Then, restart your router to force all devices to renew their leases and they should all start using the Raspberry Pi as a DHCP server instead of the router.</p> <p></p> <p></p> <figure class="wp-block-image size-large"><img src="/assets/2021/09/Screen-Shot-2021-09-26-at-10.37.09-PM-1024x636.png" alt="" class="wp-image-224"/><br/> <figcaption>The initial DHCP settings after enabling the server</figcaption> </figure> <p></p> <p></p> <h2>Wrapping Up</h2> <p></p> <p></p> <p>In this guide we have gone over the following concepts:</p> <p></p> <p></p> <ul> <li>What is a DHCP server</li> <li>What is a DNS server</li> <li>How does PiHole work</li> <li>How to install PiHole on a Raspberry Pi</li> <li>How to configure a DHCP reservation</li> <li>How to enable using the PiHole as a DNS server for all devices in the network</li> </ul> <p></p>]]></content><author><name>Natalia Maximo</name></author><category term="Guide"/><category term="dns"/><category term="guide"/><category term="pihole"/><category term="raspberry pi"/><category term="tutorial"/><category term="walkthrough"/><summary type="html"><![CDATA[In the last few guides, we have gone over how to set up a new headless Raspberry Pi with some sensible configurations, how to connect over SSH without using a password while ensuring only expected machines can connect, as well as how to use multi-factor authentication over SSH to add another layer of protection to our server. While these have all been good practices, we have not yet (at this point) actually used our Raspberry Pi for anything. Depending on where you've installed it your RasPi might be a fun conversational piece, but it would be a lot better if we could have it be working for us. Today, we'll be accomplishing that by adding PiHole to our Raspberry Pi as a DNS server, which will allow our entire network to benefit from their DNS-based ad-blocking. First, let's go over some key concepts of the tech we're going to be using. What Is a DHCP Server? Very briefly, a DHCP server is a bit of software that is able to make all the devices on a network play nicely together by giving each of them a unique identifier (their IP Address), letting them know what DNS server to use, and trying to ensure that no two machines on the network have the same address. DHCP servers remove the need for each machine to be manually configured by someone who knows the network landscape, and instead offloads that task to a computer. While most residential DHCP servers work entirely by dynamically allocating addresses to machines, they are also capable of providing reservations, which is when the DHCP server reserves an IP address for a specific machine. This is incredibly useful when you need to have a machine on your network that should always be given the same address because it needs to be predictably discovered by other machines. We see this often for network printers, servers, and other similar software. What Is a DNS Server? Whenever you click on a link or type a website's URL onto your browser's address bar there is a lot going on under the hood to bring you your content. While using the internet these days is pretty trivial, there are many systems in place that translate the experience from something that is easy for people to use (with words and text) to something that is easy for computers to operate on (broadly speaking, numbers). One of those systems is the Domain Name Service, which lets us convert URLs – such as natalia.dev – into IP addresses – such as 162.241.253.207. Whenever you go to a website, your computer first makes a request to the DNS server that it is told to use by the DHCP server with the URL of the website. The DNS server then resolves the URL into an IP address, which your computer can then use as the destination on the packet that it sends. One simple way of thinking about it is that the DNS server is similar to an address book that can tell you your friend's postal code. You consult it before you send a letter to your friend so that you can give the proper information to the post office, which will then send your letter. What Is PiHole? At its core, PiHole is akin to a DNS server. You configure it to receive DNS requests on your network, and it will take them in and resolve them. However, it has a crucial additional feature: It contains a comprehensive blocklist that allows it to determine if it should resolve it properly, or drop the request. This, in turn, allows it to drop all DNS calls to places that are known for serving ads, malicious content, trackers, and the like. You might be thinking to yourself, "the internet is mostly free right now, isn't that powered by ads? Wouldn't it be a bad thing to block them?", and on some points you would be right. It is indeed true that much of the internet is able to sustain itself by ad-based revenue. However, this comes at a fairly substantial costs to users in that it exposes additional threats. There have been many recorded incidents of using ads to spread malware, and large companies that focus on generating ad revenue rely on using your data to generate comprehensive profiles on you to target you specifically for certain kinds of ads. There are several ethical and security implications to this that warrant a full discussion on another day. For today, however, we will be going through a way that we can try to minimize this as much as possible through PiHole. Setting Up Your Network The first thing we should do is to make sure that we have a DHCP reservation for our Raspberry Pi up now. I usually like to get this step out of the way first, because I don't want to forget it. Modern routers usually include a small HTTP server that allows you to manage it via a web interface, so we'll need to go on that to set up our DHCP reservation. My network's router is at address 192.168.0.1, so I can just punch that into my address bar to get the admin panel. Yours might be different, and you can consult this article by Lifewire on how to find yours. Admin Panel for my router. Note, on different routers the DHCP settings will be on different locations. Make sure that you can find your router's settings. Once you have that address, go to it and log in. If you have never logged in before, you might need to look up your router's default admin credentials are. I highly recommend changing the password if it is still the default one. After logging in, search for the DHCP settings. This might be under a different name, such as my own router which has it under "LAN Setup". Find the setting for "DHCP Reservation", and make one for your Raspberry Pi to maintain the same IP address. Reserving a client IP address for the Raspberry Pi Once you have this reservation complete, save your configurations and close out of the admin panel. Now we're ready to start setting up our pihole. Installing PiHole It is broadly recommended that we always look at code we're downloading from the internet before we run it on our systems. So first, let's download the basic installer code with the following command: wget -O basic-install.sh https://install.pi-hole.net Downloading the pi-hole installer script We can then review that code by opening it up in nano, or using less, and review it to make sure it doesn't seem to be doing anything wrong. Once we've finished with that process, we can run the script with the following command: sudo bash basic-install.sh This will start a series of checks and package installations. You will then have to go through some menus, and select which interface to use. Since I am using my Raspberry Pi connected to ethernet, I chose the eth0 interface instead of the wlan0. If your interface names don't quite match, a good rule of thumb is that if it starts with eth it is most likely ethernet. If you're unsure, press 'Cancel' and figure out which interface you need to use. Eventually, you will be prompted with a screen notifying you that PiHole needs a static IP, and then finally a selection screen for what upstream DNS provider you would like to use. Selection screen for the Upstream DNS Server Which server you pick ends up being a matter of personal preference, and there's quite a few available. Personally, I like to go with OpenDNS, which I believe is currently owned by CISCO, since they support DNSSEC and are broadly a security-minded company. You can choose whichever one you find most appropriate based on your own criteria. Afterwards, press Enter to accept, and leave the remainder of the settings as default until you reach the menu shown below: The Privacy Mode selection menu You can read a little bit more about what each privacy mode is on this link. I recommend you pick the one most appropriate for your home use. I won't touch too much on the ethics of logging information of the devices of your home, but I would like to take a minute to at least recommend that if you live with other people, you should check in with them before storing their data. It might be more appropriate to hide some or all of the information that is logged. Once you have made your selection, the installer will continue setting up the config files and packages you need to run the software. Once you have completed the installation, it's time that we set up our DNS servers to point to our new PiHole! The finishing screen for the PiHole installation. Pressing Enter on the &lt;Ok&gt; button will show you your terminal, which includes the default admin password. Setting up DNS Server Locally I'm a very big proponent of the idea that we should fail fast, fail often, and fail small. As such, before we set all of our devices to use our new PiHole, we should first make sure that it is actually working appropriately. You'll need to change your DNS settings to point to the new PiHole. Once that is done, try navigating to the admin panel at http://pi.hole/admin. If you see the PiHole dashboard, your installation should be working! Try navigating to a few sites, such as your email or a local news site, to confirm that everything still works appropriately. PiHole Dashboard Setting up PiHole as Default DNS Server Once we have confirmation that our PiHole works, it's time to make sure that our router sets the PiHole as the default DNS server for the entire network. Log back in to your admin panel, and search for the DNS settings of your router. Search for your DNS settings, and set the default server to be your PiHole's address Setting the PiHole as the default DNS. Note, since we always want the adblocking feature turned on, we don't want to offer a secondary DNS server. Once that is done, save your settings. If you are patient, now you can simply wait and whenever new devices connect (or old devices have their lease expire), you should have the PiHole be their DNS server. If you are like me and want to see the fruits of my labour kick in instantly, just restart your router. All devices will have to reacquire their lease, which will update the DNS setting for all devices immediately. Using the PiHole as a DHCP Server If you log in to the Admin Panel on the PiHole, you may have noticed that the clients are (at least for the most part) only shown by their IP address. This means that if an IP address changes, the logs cannot be properly attributed to a specific client, and the clients are not meaningfully described. As well, some routers, especially the ones that are provided by Internet Service Providers (ISPs), don't actually allow you to change your default DNS server. If that is the case, you won't actually be able to use PiHole automatically without other changes. In all of these cases, it might be wiser to use the PiHole itself as the DHCP server for your network. To start, go on your PiHole admin panel, navigate to Settings and DHCP settings. Click the checkbox to enable using the Pi as a DHCP server, and set the IP address range to appropriate values. Then, press "Save", and go to your router's admin panel and disable the DHCP functionality on the router. Then, restart your router to force all devices to renew their leases and they should all start using the Raspberry Pi as a DHCP server instead of the router. The initial DHCP settings after enabling the server Wrapping Up In this guide we have gone over the following concepts: What is a DHCP server What is a DNS server How does PiHole work How to install PiHole on a Raspberry Pi How to configure a DHCP reservation How to enable using the PiHole as a DNS server for all devices in the network]]></summary></entry><entry><title type="html">SSH Multifactor Authentication with Google Authenticator and YubiKey</title><link href="https://natalia.dev/2021/09/25/ssh-multifactor-authentication-with-google-authenticator-and-yubikey/" rel="alternate" type="text/html" title="SSH Multifactor Authentication with Google Authenticator and YubiKey"/><published>2021-09-25T16:22:01+00:00</published><updated>2021-09-25T16:22:01+00:00</updated><id>https://natalia.dev/2021/09/25/ssh-multifactor-authentication-with-google-authenticator-and-yubikey</id><content type="html" xml:base="https://natalia.dev/2021/09/25/ssh-multifactor-authentication-with-google-authenticator-and-yubikey/"><![CDATA[<p></p> <p>In my previous guide, we went over <a href="https://natalia.dev/2021/09/24/ssh-with-no-password-using-public-key-cryptography/?utm_source=rss&amp;utm_medium=rss&amp;utm_campaign=ssh-with-no-password-using-public-key-cryptography" data-type="URL" data-id="https://natalia.dev/2021/09/24/ssh-with-no-password-using-public-key-cryptography/?utm_source=rss&amp;utm_medium=rss&amp;utm_campaign=ssh-with-no-password-using-public-key-cryptography" target="_blank" rel="noreferrer noopener">how to enable passwordless authentication for SSH</a> to increase the security of our Raspberry Pi, as well as how to configure the SSH server to have improved security. If you've been following along, you should now have a system with the following properties:</p> <p></p> <p></p> <ul> <li>The only user that can connect over SSH is the <code>pi</code> user</li> <li>The Raspberry Pi only accepts incoming connections through public key authentication</li> <li>5 minutes of inactivity causes your SSH session to be terminated by the server</li> </ul> <p></p> <p></p> <p>These are all great practices to start with, and should we open up our Raspberry Pi so that we can connect over SSH from anywhere in the world, we should be protected from anyone guessing our password or exploiting any other potential accounts on our system to log in through SSH.</p> <p></p> <p></p> <p>There are, however, a handful of things that our system would not be protected against. For example, if we forget the computer open on a table while at a coffee shop (if we ever truly get back to being able to hang out at a coffee shop) or if the computer gets stolen, it would then be possible for an attacker to access our Raspberry Pi. Adding a second factor will help abate more sophisticated attacks, which might be required due to your threat model.</p> <p></p> <p></p> <h2>How Does Multifactor Authentication Work With SSH?</h2> <p></p> <p></p> <p>SSH, and many other applications, can use something called PAM (which stands for <a rel="noreferrer noopener" href="https://en.wikipedia.org/wiki/Pluggable_authentication_module" data-type="URL" data-id="https://en.wikipedia.org/wiki/Pluggable_authentication_module" target="_blank">Pluggable Authentication Module</a>). This module allows various applications to use a common authentication layer, which can communicate with different modules. Different companies (or individuals) can then write these modules, which we can install through the <code>apt</code> package manager.</p> <p></p> <p></p> <p>For this specific guide, we'll be using Google Authenticator to set up <a rel="noreferrer noopener" href="https://en.wikipedia.org/wiki/Time-based_One-Time_Password" data-type="URL" data-id="https://en.wikipedia.org/wiki/Time-based_One-Time_Password" target="_blank">Time-based One Time Password</a> (TOTP) through a phone application (such as <a rel="noreferrer noopener" href="https://authy.com" target="_blank">Authy</a>, <a rel="noreferrer noopener" href="https://support.google.com/accounts/answer/1066447?hl=en&amp;co=GENIE.Platform%3DAndroid" target="_blank">Google Authenticator</a>, or <a rel="noreferrer noopener" href="https://www.microsoft.com/en-us/security/mobile-authenticator-app" data-type="URL" data-id="https://www.microsoft.com/en-us/security/mobile-authenticator-app" target="_blank">Microsoft Authenticator</a>), as well as setting up a physical hardware key using <a rel="noreferrer noopener" href="https://www.yubico.com/products/yubikey-5-overview/" data-type="URL" data-id="https://www.yubico.com/products/yubikey-5-overview/" target="_blank">YubiKey</a>. With the way we will be configuring our PAM, you will be able to use either of those methods for two-factor authentication, but if you would like you are also able to set up triple-factor by requiring both of these methods instead of just one. Personally, this goes beyond what my threat model requires: I set up both methods so that one can act as a backup to the other.</p> <p></p> <p></p> <h2>Setting up Google Authenticator</h2> <p></p> <p></p> <p>While you might be familiar with Google Authenticator as a phone application that allows you to scan QR codes to add two-factor authentication to your accounts, there is also a Google Authenticator PAM library to allow you to create a QR code to scan on your phone to provide the TOTP codes. While these two applications share a name, they are not necessarily linked: you can use any application that supports TOTP to scan the resulting QR code.</p> <p></p> <p></p> <p>To start, let's connect to our Raspberry Pi. If you followed along the last tutorial, you should be able to do so without writing in your password. Since my Raspberry Pi's hostname is <code>steve</code>, I can connect to it with the following command:</p> <p></p> <p></p> <pre class="wp-block-code"><code>ssh pi@steve.local</code></pre> <p></p> <p></p> <p>Next, we need to install the PAM library, which we can do through our <code>apt</code> package manager:</p> <p></p> <p></p> <pre class="wp-block-code"><code>sudo apt install libpam-google-authenticator -y</code></pre> <p></p> <p></p> <p>Once it has finished installing, we need to set up the TOTP application on a mobile phone. Personally, I use Google Authenticator for most of the 2FA I use for my accounts, so I will use it for this also, but any other authenticator would do.</p> <p></p> <p></p> <p>When the download is completed, go back to your Pi terminal. Depending on how long it took your download to complete, you might have been timed out of your connection to the Raspberry Pi. This is good and expected behaviour: We do not want to allow idle sessions to live for very long. Once you are back in your RasPi shell, run the following command:</p> <p></p> <p></p> <pre class="wp-block-code"><code>google-authenticator</code></pre> <p></p> <p></p> <p>This will create a new secret key and a QR code for you to scan. Open up your authenticator application, click on "Scan QR code", and point your phone camera at the terminal. You might have to increase your terminal size and/or scroll up.</p> <p></p> <p></p> <div class="wp-block-image"> <figure class="aligncenter size-large is-resized"><img src="/assets/2021/09/Screen-Shot-2021-09-25-at-11.05.14-AM-1024x764.png" alt="" class="wp-image-208" width="615" height="458"/><br/> <figcaption>A terminal with the google-authenticator QR code. DO NOT SHARE THIS QR CODE WITH ANYONE. This would allow them access into your system, which is a security risk! Immediately after writing this guide, I deleted this secret key and generated a new one.</figcaption> </figure> </div> <p></p> <p></p> <p>Your terminal will also display "emergency scratch codes". These should be kept hidden and protected somewhere only you can reach, as they are codes you can use in lieu of the TOTP codes displayed on your application. Personally, I write mine as a secure note on my password manager, <a rel="noreferrer noopener" href="https://www.lastpass.com" data-type="URL" data-id="https://www.lastpass.com" target="_blank">Lastpass</a>.</p> <p></p> <p></p> <p>You will also be prompted for a series of configuration choices. You can read through them and decide what is most suitable for your own setup and network. You can see my configuration choices in the screenshot below:</p> <p></p> <p></p> <div class="wp-block-image"> <figure class="aligncenter size-large is-resized"><img src="/assets/2021/09/Screen-Shot-2021-09-25-at-11.05.24-AM-1024x557.png" alt="" class="wp-image-209" width="577" height="313"/><br/> <figcaption>Configuration choices for the google authenticator. I opted to disable multiple uses of the same token, to keep the default size of 3 permitted codes, and to enable rate-limiting.</figcaption> </figure> </div> <p></p> <p></p> <p>Now that you've got that set up, it's time to tell PAM to use the Google Authenticator as well as enabling SSH to properly allow PAM to run. Let's start by going back to our <code>/etc/ssh/sshd_config</code> file. As we did last time, make sure to create a backup of the current configurations by running <code>sudo cp /etc/ssh/sshd_config /etc/ssh/sshd_config.bak</code>.</p> <p></p> <p></p> <p>Open up the file now by using <code>sudo nano /etc/ssh/sshd_config</code> and make the following changes:</p> <p></p> <p></p> <ul> <li>Find the line <code>ChallengeResponseAuthentication no</code> and change it to <code>ChallengeResponseAuthentication yes</code></li> <li>Find the line <code>UsePAM yes</code>, and add the line <code>AuthenticationMethods publickey,keyboard-interactive</code> below it.</li> </ul> <p></p> <p></p> <p>Now press <code>CTRL+S</code> to save and <code>CTRL+X</code> to exit. Now it's time for us to tell PAM to use our Google Authenticator TOTP for login, and to prevent it from requesting the password.</p> <p></p> <p></p> <p>First, make a backup of the configuration file by running <code>sudo cp /etc/pam.d/sshd /etc/pam.d/sshd.bak</code>. Then, open up the file by running <code>sudo nano /etc/pam.d/sshd</code>, and make the following changes:</p> <p></p> <p></p> <ul> <li>Find the line <code>@include common-auth</code> and change it to be <code>#@include common-auth</code> <ul> <li>This will "comment out" the line, which in turn will disable PAM from trying to use the password for authentication</li> </ul> </li> <li>Immediately below the <code>#@include common-auth</code> line, add the line <code>auth sufficient pam_google_authenticator.so</code> <ul> <li>This will enable PAM to use the Google Authenticator module</li> </ul> </li> </ul> <p></p> <p></p> <p>Press <code>CTRL+S</code> to save the file and <code>CTRL+X</code> to close it. Then, run the following command to restart the SSH server:</p> <p></p> <p></p> <pre class="wp-block-code"><code>sudo systemctl restart ssh</code></pre> <p></p> <p></p> <p>Now, before you close out of this session we should test to make sure our authentication is working appropriately.</p> <p></p> <p></p> <p>Open up a new terminal window, and try to connect via SSH. You should be prompted to punch in your verification code (which is the TOTP that is now on your authenticator phone app). Put in the correct code, and it should let you in to your shell. If that is the case, congratulations! Your configurations work and you have now enabled TOTP multi factor authentication for connecting to your server.</p> <p></p> <p></p> <p>If for some reason you cannot log in with your TOTP, you can go back to your original terminal session, and restore your original PAM and SSH configurations and try again. If the problem persists, I encourage you to <a rel="noreferrer noopener" href="https://sendinquiri.es/natalia" data-type="URL" data-id="https://sendinquiri.es/natalia" target="_blank">reach out to me</a> and I'd be happy to try to help you debug.</p> <p></p> <p></p> <h2>Setting up YubiKey for MFA</h2> <p></p> <p></p> <p>I'm a huge fan of hardware-based authentication. I wrote a little bit about how we used them when I interned at Google in my last blog post, and since working there I have purchased one of my own because I stand by their value. Additionally, while I am a security-conscious person, I am also a very lazy person by nature. I strongly believe in using multi factor authentication, but I also want it to be as simple as possible to use. Physical keys for MFA are perfect for this use: I can plug one in to my laptop when I log in, and whenever I need to prove my identity I just need to press a button. No need to pull out my phone, or copy over a code to my computer.</p> <p></p> <p></p> <p>For those unfamiliar with what YubiKey is, they are a series of USB- &amp; NFC-based security devices. The general premise is that you can plug one in to your computer, and by pressing a button you can generate a one-time passcode.</p> <p></p> <p></p> <p>To use a Yubikey for MFA you will need your key identifier (which is part of your Yubico OTP that are generated by pressing the button on your Yubikey), and a Client ID from the <a href="https://upgrade.yubico.com/getapikey/" data-type="URL" data-id="https://upgrade.yubico.com/getapikey/" target="_blank" rel="noreferrer noopener">Yubikey API</a>.</p> <p></p> <p></p> <h3>Anatomy of a Yubico OTP</h3> <p></p> <p></p> <p>A Yubico OTP is comprised of two parts: The last 32 characters of the OTP are a randomly generated code, and the remaining characters at the beginning of the string are the identifier for the key. If you have a Yubikey, you can get the key identifier by cutting out the last 32 characters of a OTP that you generate, or you can run it through the python code below:</p> <p></p> <p></p> <pre class="wp-block-code"><code>import sys

def extract_id(otp):
    return otp&#91;:-32]

if __name__ == '__main__':
    print(extract_id(sys.argv&#91;1]))</code></pre> <p></p> <p></p> <p>To run this code, copy and paste it into a file called <code>otp.py</code> then run the command <code>python3 otp.py &lt;OTP&gt;</code>, where <code>&lt;OTP&gt;</code> is a code you generated by pressing on your Yubikey.</p> <p></p> <p></p> <p>Once you have your key ID, write it down somewhere as we will be using it soon.</p> <p></p> <p></p> <h3>Getting Your Yubico Client ID</h3> <p></p> <p></p> <figure class="wp-block-image size-large"><img src="/assets/2021/09/Screen-Shot-2021-09-25-at-12.18.55-PM-1024x449.png" alt="" class="wp-image-210"/><br/> <figcaption>The Yubico API Key signup page</figcaption> </figure> <p></p> <p></p> <p>Navigate to the <a rel="noreferrer noopener" href="https://upgrade.yubico.com/getapikey/" data-type="URL" data-id="https://upgrade.yubico.com/getapikey/" target="_blank">Yubico API Key signup page</a> and put in your email, then press on your Yubikey to generate a OTP on the "YubiKey OTP" input box. You will need to accept the terms and conditions to proceed, and I recommend at least glancing through them. Once you are done, you can press "Get API Key", and you will be given a Client ID and a secret. You can note down the secret somewhere safe, such as a password manager, but we will not be using it further. The thing that is most important for our use is the Client ID.</p> <p></p> <p></p> <p>Now that we have the pre-requisites, we can start setting up the Yubico PAM module.</p> <p></p> <p></p> <h2>Configuring PAM to use your YubiKey</h2> <p></p> <p></p> <p>First, we need to install the PAM library that will be used to authenticate with the YubiKey. You can do so by running the following command:</p> <p></p> <p></p> <pre class="wp-block-code"><code>sudo apt install libpam-yubico -y</code></pre> <p></p> <p></p> <p>Once that is finished, we need to write a file that will allow us to associate a specific key ID to a specific user on our system. Let's create a file that we can keep in the <code>/etc/pam.d</code> directory that has all the users and their associated keys. Run the following command:</p> <p></p> <p></p> <pre class="wp-block-code"><code>sudo touch /etc/pam.d/yubiauth</code></pre> <p></p> <p></p> <p>Then open the file with <code>nano</code>. You should have a blank file now, and we need to populate it with our user ID, as well as the key ID, separated by the <code>:</code> character. For example, to associate the key with the ID <code>abcdefg</code> to our <code>pi</code> user, we would write the following:</p> <p></p> <p></p> <pre class="wp-block-code"><code>pi:abcdefg</code></pre> <p></p> <p></p> <p>Then press <code>CTRL+S</code> to save, and <code>CTRL+X</code> to close the file.</p> <p></p> <p></p> <p>We can also associate more than one key to a user, and associate keys with other users. To add a key to the same user, add <code>:&lt;KEY_ID&gt;</code> to the end of the line, and to add a new user you should place it on a new line and add in the username and key id (or key ids) you want to associate with that user. For example, to add the key <code>xyzabc</code> to our <code>pi</code> user and also associate it to a different user called <code>test</code>, we would have our final file look as such:</p> <p></p> <p></p> <pre class="wp-block-code"><code>pi:abcdefg:xyzabc
test:xyzabc</code></pre> <p></p> <p></p> <p>This file will allow PAM to confirm that the OTP that you provide during login is actually connected to the account you are trying to use.</p> <p></p> <p></p> <p>Next, open up the <code>/etc/pam.d/sshd</code> file, and add the following line <strong><em>above</em></strong> the Google Authenticator line.</p> <p></p> <p></p> <pre class="wp-block-code"><code>auth sufficient pam_yubico.so id=&lt;CLIENT_ID&gt; authfile=/etc/pam.d/yubiauth</code></pre> <p></p> <p></p> <p>Replacing <code>&lt;CLIENT_ID&gt;</code> with the Client ID you got from the Yubico API key signup page.</p> <p></p> <p></p> <p>Once that is complete, open up a new terminal window, and attempt to connect to your Pi through SSH. It should now prompt you to press your YubiKey to allow you to log in:</p> <p></p> <p></p> <div class="wp-block-image"> <figure class="aligncenter size-large is-resized"><img src="/assets/2021/09/Screen-Shot-2021-09-25-at-1.09.20-PM-1024x813.png" alt="" class="wp-image-211" width="620" height="491"/><br/> <figcaption>Logging in through SSH while using a YubiKey</figcaption> </figure> </div> <p></p> <p></p> <p>If you lose your YubiKey, or do not have it available, you will still be able to log in to your Raspberry Pi by using the Google Authenticator code that we set up earlier in the tutorial. You can see an example of that below:</p> <p></p> <p></p> <div class="wp-block-image"> <figure class="aligncenter size-large is-resized"><img src="/assets/2021/09/Screen-Shot-2021-09-25-at-1.11.20-PM-1024x811.png" alt="" class="wp-image-212" width="593" height="469"/><br/> <figcaption>Using the TOTP from Google Authenticator to log in through SSH</figcaption> </figure> </div> <p></p> <p></p> <p>If your want, or need, to have both of those set up simultaneously such that a user has to both have the YubiKey and the TOTP code you can simply edit the <code>/etc/pam.d/sshd</code> file, changing the word "<code>sufficient</code>" to "<code>required</code>" on the lines that we have added.</p> <p></p> <p></p> <p>You might be wondering why we had to add the line above the one that was set up for the Google Authenticator. This is because we want the login to prompt for YubiKey first, and use the Google Authenticator more as a backup, as the YubiKey is more convenient. If this is not the case for you, and you want your SSH to prefer the Google Authenticator, you can swap the order of the lines. If you would like to disable either of those methods of 2FA, you can simply add a <code>#</code> to the beginning of the line. Note, if you want to disable <em>both</em> of the 2FA methods, you will also need to restore the old version of your <code>/etc/ssh/sshd_config</code> file, since your SSH will be expecting the multiple factors.</p> <p></p> <p></p> <h2>Wrapping Up</h2> <p></p> <p></p> <p>In this guide, we covered these concepts:</p> <p></p> <p></p> <ul> <li>How SSH can connect to the PAM modules to provide extra authentication</li> <li>How to enable multiple required factors for authentication</li> <li>How to install and set up Google Authenticator for using TOTP for our SSH sessions</li> <li>How to install and set up Yubico for hardware-based 2FA</li> </ul> <p></p> <p></p> <p>At this point, our Raspberry Pi is fairly hardened against most common forms of attack: It does not use a password, it requires a private key that is encrypted in our system, and it requires the use of a secondary form of authentication.</p> <p></p> <p></p> <p>For the next guide, we will be going over one incredibly cool software that we can run on our Raspberry Pi to improve our home networks by setting up a dedicated PiHole on our Raspberry Pi.</p> <p></p>]]></content><author><name>Natalia Maximo</name></author><category term="Guide"/><category term="2FA"/><category term="google authenticator"/><category term="MFA"/><category term="OTP"/><category term="raspberry pi"/><category term="raspi"/><category term="ssh"/><category term="yubico"/><category term="yubikey"/><summary type="html"><![CDATA[In my previous guide, we went over how to enable passwordless authentication for SSH to increase the security of our Raspberry Pi, as well as how to configure the SSH server to have improved security. If you've been following along, you should now have a system with the following properties: The only user that can connect over SSH is the pi user The Raspberry Pi only accepts incoming connections through public key authentication 5 minutes of inactivity causes your SSH session to be terminated by the server These are all great practices to start with, and should we open up our Raspberry Pi so that we can connect over SSH from anywhere in the world, we should be protected from anyone guessing our password or exploiting any other potential accounts on our system to log in through SSH. There are, however, a handful of things that our system would not be protected against. For example, if we forget the computer open on a table while at a coffee shop (if we ever truly get back to being able to hang out at a coffee shop) or if the computer gets stolen, it would then be possible for an attacker to access our Raspberry Pi. Adding a second factor will help abate more sophisticated attacks, which might be required due to your threat model. How Does Multifactor Authentication Work With SSH? SSH, and many other applications, can use something called PAM (which stands for Pluggable Authentication Module). This module allows various applications to use a common authentication layer, which can communicate with different modules. Different companies (or individuals) can then write these modules, which we can install through the apt package manager. For this specific guide, we'll be using Google Authenticator to set up Time-based One Time Password (TOTP) through a phone application (such as Authy, Google Authenticator, or Microsoft Authenticator), as well as setting up a physical hardware key using YubiKey. With the way we will be configuring our PAM, you will be able to use either of those methods for two-factor authentication, but if you would like you are also able to set up triple-factor by requiring both of these methods instead of just one. Personally, this goes beyond what my threat model requires: I set up both methods so that one can act as a backup to the other. Setting up Google Authenticator While you might be familiar with Google Authenticator as a phone application that allows you to scan QR codes to add two-factor authentication to your accounts, there is also a Google Authenticator PAM library to allow you to create a QR code to scan on your phone to provide the TOTP codes. While these two applications share a name, they are not necessarily linked: you can use any application that supports TOTP to scan the resulting QR code. To start, let's connect to our Raspberry Pi. If you followed along the last tutorial, you should be able to do so without writing in your password. Since my Raspberry Pi's hostname is steve, I can connect to it with the following command: ssh pi@steve.local Next, we need to install the PAM library, which we can do through our apt package manager: sudo apt install libpam-google-authenticator -y Once it has finished installing, we need to set up the TOTP application on a mobile phone. Personally, I use Google Authenticator for most of the 2FA I use for my accounts, so I will use it for this also, but any other authenticator would do. When the download is completed, go back to your Pi terminal. Depending on how long it took your download to complete, you might have been timed out of your connection to the Raspberry Pi. This is good and expected behaviour: We do not want to allow idle sessions to live for very long. Once you are back in your RasPi shell, run the following command: google-authenticator This will create a new secret key and a QR code for you to scan. Open up your authenticator application, click on "Scan QR code", and point your phone camera at the terminal. You might have to increase your terminal size and/or scroll up. A terminal with the google-authenticator QR code. DO NOT SHARE THIS QR CODE WITH ANYONE. This would allow them access into your system, which is a security risk! Immediately after writing this guide, I deleted this secret key and generated a new one. Your terminal will also display "emergency scratch codes". These should be kept hidden and protected somewhere only you can reach, as they are codes you can use in lieu of the TOTP codes displayed on your application. Personally, I write mine as a secure note on my password manager, Lastpass. You will also be prompted for a series of configuration choices. You can read through them and decide what is most suitable for your own setup and network. You can see my configuration choices in the screenshot below: Configuration choices for the google authenticator. I opted to disable multiple uses of the same token, to keep the default size of 3 permitted codes, and to enable rate-limiting. Now that you've got that set up, it's time to tell PAM to use the Google Authenticator as well as enabling SSH to properly allow PAM to run. Let's start by going back to our /etc/ssh/sshd_config file. As we did last time, make sure to create a backup of the current configurations by running sudo cp /etc/ssh/sshd_config /etc/ssh/sshd_config.bak. Open up the file now by using sudo nano /etc/ssh/sshd_config and make the following changes: Find the line ChallengeResponseAuthentication no and change it to ChallengeResponseAuthentication yes Find the line UsePAM yes, and add the line AuthenticationMethods publickey,keyboard-interactive below it. Now press CTRL+S to save and CTRL+X to exit. Now it's time for us to tell PAM to use our Google Authenticator TOTP for login, and to prevent it from requesting the password. First, make a backup of the configuration file by running sudo cp /etc/pam.d/sshd /etc/pam.d/sshd.bak. Then, open up the file by running sudo nano /etc/pam.d/sshd, and make the following changes: Find the line @include common-auth and change it to be #@include common-auth This will "comment out" the line, which in turn will disable PAM from trying to use the password for authentication Immediately below the #@include common-auth line, add the line auth sufficient pam_google_authenticator.so This will enable PAM to use the Google Authenticator module Press CTRL+S to save the file and CTRL+X to close it. Then, run the following command to restart the SSH server: sudo systemctl restart ssh Now, before you close out of this session we should test to make sure our authentication is working appropriately. Open up a new terminal window, and try to connect via SSH. You should be prompted to punch in your verification code (which is the TOTP that is now on your authenticator phone app). Put in the correct code, and it should let you in to your shell. If that is the case, congratulations! Your configurations work and you have now enabled TOTP multi factor authentication for connecting to your server. If for some reason you cannot log in with your TOTP, you can go back to your original terminal session, and restore your original PAM and SSH configurations and try again. If the problem persists, I encourage you to reach out to me and I'd be happy to try to help you debug. Setting up YubiKey for MFA I'm a huge fan of hardware-based authentication. I wrote a little bit about how we used them when I interned at Google in my last blog post, and since working there I have purchased one of my own because I stand by their value. Additionally, while I am a security-conscious person, I am also a very lazy person by nature. I strongly believe in using multi factor authentication, but I also want it to be as simple as possible to use. Physical keys for MFA are perfect for this use: I can plug one in to my laptop when I log in, and whenever I need to prove my identity I just need to press a button. No need to pull out my phone, or copy over a code to my computer. For those unfamiliar with what YubiKey is, they are a series of USB- &amp; NFC-based security devices. The general premise is that you can plug one in to your computer, and by pressing a button you can generate a one-time passcode. To use a Yubikey for MFA you will need your key identifier (which is part of your Yubico OTP that are generated by pressing the button on your Yubikey), and a Client ID from the Yubikey API. Anatomy of a Yubico OTP A Yubico OTP is comprised of two parts: The last 32 characters of the OTP are a randomly generated code, and the remaining characters at the beginning of the string are the identifier for the key. If you have a Yubikey, you can get the key identifier by cutting out the last 32 characters of a OTP that you generate, or you can run it through the python code below: import sys]]></summary></entry><entry><title type="html">SSH With No Password Using Public Key Cryptography</title><link href="https://natalia.dev/2021/09/24/ssh-with-no-password-using-public-key-cryptography/" rel="alternate" type="text/html" title="SSH With No Password Using Public Key Cryptography"/><published>2021-09-24T18:30:27+00:00</published><updated>2021-09-24T18:30:27+00:00</updated><id>https://natalia.dev/2021/09/24/ssh-with-no-password-using-public-key-cryptography</id><content type="html" xml:base="https://natalia.dev/2021/09/24/ssh-with-no-password-using-public-key-cryptography/"><![CDATA[<p></p> <p>In the last blog post, we covered <a rel="noreferrer noopener" href="https://natalia.dev/2021/09/23/setting-up-headless-raspberry-pi-with-raspberry-pi-os/" data-type="URL" data-id="https://natalia.dev/2021/09/23/setting-up-headless-raspberry-pi-with-raspberry-pi-os/" target="_blank">how to set up a headless Raspberry Pi</a>, and we connected to our Raspberry Pi by using the <strong>S</strong>ecure <span style="font-weight: 600;"><strong>SH</strong></span>ell (SSH) protocol. This is a really good protocol for connecting to servers, and is used pretty ubiquitously in the industry. However, with our current setup, our Raspberry Pi still suffers from one crucial issue when connecting through SSH: it relies on a password.</p> <p></p> <p></p> <p>Passwords are something I have hated for quite some time. They are a simple (bad) solution to the complex problem of authentication. More often than not, they are easy to guess, regularly reused, and too easily we as human beings can be tricked into giving them away.</p> <p></p> <p></p> <p>I believe it's important to understand why you should use SSH keys, and have at least some understanding as to how it works. I have included as part of this guide a quick primer on authentication and a very quick primer on public key cryptography. These are not important to setting up passwordless SSH access, so feel free to skip it if you already understand these concepts, or don't feel the need to read through them.</p> <p></p> <p></p> <hr class="wp-block-separator"/> </p> <p></p> <h2>A Quick Primer on Authentication</h2> <p></p> <p></p> <p>There are three main ways you can be authenticated as a user:</p> <p></p> <p></p> <ul> <li>Something you know</li> <li>Something you have</li> <li>Something you are</li> </ul> <p></p> <p></p> <p>Passwords would fall into the first category: something you know. Unfortunately, if your authentication relies only on something you know, it is often easy to steal or in some other way have it be compromised. One common way that this happens is through leaked passwords: If a service you once signed up for with the same password has their database be stolen, and they didn't take proper steps to secure that database, your password (regardless of how good it might be) could be compromised.</p> <p></p> <p></p> <p>If you have an iPhone, or many of the more recent Android devices, you are likely familiar with the third category: with <a href="https://support.apple.com/en-ca/HT208108" data-type="URL" data-id="https://support.apple.com/en-ca/HT208108" target="_blank" rel="noreferrer noopener">Face ID</a> the iPhone is able to evaluate your face and determine if it is you, and with <a href="https://support.apple.com/en-us/HT204587" data-type="URL" data-id="https://support.apple.com/en-us/HT204587" target="_blank" rel="noreferrer noopener">Touch ID</a> (and the Android fingerprint sensors) your phone is able to use your fingerprint to determine identity.</p> <p></p> <p></p> <p>You might also be familiar with the second category. It is becoming increasingly common for services to use multi-factor authentication, which uses more than one item to secure your account. Usually, this is something like a one-time password provided by applications such as <a href="https://support.google.com/accounts/answer/1066447?hl=en&amp;co=GENIE.Platform%3DAndroid" data-type="URL" data-id="https://support.google.com/accounts/answer/1066447?hl=en&amp;co=GENIE.Platform%3DAndroid" target="_blank" rel="noreferrer noopener">Google Authenticator</a>, <a href="https://authy.com" data-type="URL" data-id="https://authy.com" target="_blank" rel="noreferrer noopener">Authy</a>, or <a href="https://www.microsoft.com/en-us/security/mobile-authenticator-app" data-type="URL" data-id="https://www.microsoft.com/en-us/security/mobile-authenticator-app" target="_blank" rel="noreferrer noopener">Microsoft Authenticator</a>. A different method that uses the same basic principle is to use a hardware-based key, such as a <a rel="noreferrer noopener" href="https://www.yubico.com/products/yubikey-5-overview/" data-type="URL" data-id="https://www.yubico.com/products/yubikey-5-overview/" target="_blank">YubiKey</a>. When I was a Google intern, they provided hardware keys to secure our employee accounts, and <a rel="noreferrer noopener" href="https://www.yubico.com/resources/reference-customers/google/" data-type="URL" data-id="https://www.yubico.com/resources/reference-customers/google/" target="_blank">it has been very successful in preventing account takeovers</a>.</p> <p></p> <p></p> <p>The goal of this guide is to move our SSH authentication from a password (something you know, which can be compromised) to something you have (your computer). The way we do this is through something called "Public Key Cryptography"</p> <p></p> <p></p> <h2>A <em>Very</em> Quick Primer on Public-Key Cryptography</h2> <p></p> <p></p> <p>I won't go over <a href="https://en.wikipedia.org/wiki/Public-key_cryptography" data-type="URL" data-id="https://en.wikipedia.org/wiki/Public-key_cryptography" target="_blank" rel="noreferrer noopener">public-key cryptography</a> in a lot of detail in this post, since it's a very complex topic that I could not hope to do justice in a single post, let alone a section of one. The most important thing to know at a high level is that public key cryptography uses a pair of very large numbers (which we call keys), one of which you must keep secret (the private key), and one of which you can give to others (the public key).</p> <p></p> <p></p> <p>With your private key, you can <em>sign</em> some information to confirm that it came from you, and anyone that has a copy of your public key can <em>verify</em> the signature. This means that keeping the private key secret is very important, since anyone who has access to it can effectively impersonate you. However, unlike passwords, you never actually provide the private key to a service you are using, which means you can use the same pair of keys as much as you would like. Since your public key can be published anywhere safely (assuming your private key is secret), it can never render your account vulnerable if it is stolen from a service you use.</p> <p></p> <p></p> <p>To authenticate with our Raspberry Pi, we will be using the <a rel="noreferrer noopener" href="https://en.wikipedia.org/wiki/EdDSA#Ed25519" data-type="URL" data-id="https://en.wikipedia.org/wiki/EdDSA#Ed25519" target="_blank">ED25519</a> signing scheme, which is based on something called "<a href="https://en.wikipedia.org/wiki/Elliptic-curve_cryptography" data-type="URL" data-id="https://en.wikipedia.org/wiki/Elliptic-curve_cryptography" target="_blank" rel="noreferrer noopener">Elliptic-curve Cryptography</a>". If you're familiar with some amount of cryptography, you might be familiar with RSA, which is a commonly-used system, and might be wondering why we would use a different system. RSA is not considered to be secure for key sizes below 2048 bits, and compared to ED25519 it is substantially slower and has a substantially larger key size. ED25519 is still considered to be computationally secure, so it provides comparable protection (in that it cannot be broken, to our knowledge, with existing and expected near-future technology within the lifetime of the universe).</p> <p></p> <p></p> <h2>Why Should I Care?</h2> <p></p> <p></p> <p>That is a very good question. The first reason why you might care is that by switching over to using keys you will be able to log in without having to type a password each time. The convenience factor is the primary reason for most people. As an added perk, your system also becomes safer: it is easier to steal a password than it is to steal a specific file on your computer.</p> <p></p> <p></p> <p>As a consequence, only the machines that you've previously uploaded SSH keys from will be able to connect to your RasPi.</p> <p></p> <p></p> <hr class="wp-block-separator"/> </p> <p></p> <h2>Creating your SSH Key</h2> <p></p> <p></p> <p>The very first step in setting up public key based authentication is to actually create the key. If you're on Unix or Mac OS (this also includes using WSL/WSL 2 on Windows), you can run the following command to start the key creation process:</p> <p></p> <p></p> <pre class="wp-block-code"><code>ssh-keygen -t ed25519</code></pre> <p></p> <p></p> <p>Select the file name or leave it blank to use the default filename (~/.ssh/id_ed25519). Then, set a passphrase for that key. This passphrase will be used to "lock" your private key, so that even if it gets stolen, the attacker would need to know that passphrase to access the key and subsequently access your Raspberry Pi.</p> <p></p> <p></p> <div class="wp-block-image"> <figure class="aligncenter size-large is-resized"><img src="/assets/2021/09/Screen-Shot-2021-09-23-at-6.07.19-PM-1024x820.png" alt="" class="wp-image-185" width="615" height="492"/><br/> <figcaption>Generating an SSH Key</figcaption> </figure> </div> <p></p> <p></p> <p>This will generate two files: <code>~/.ssh/id_ed25519</code> and <code>~/.ssh/id_ed25519.pub</code>. As you might guess, the .pub file is the public key, and the file with no extension is the private key.</p> <p></p> <p></p> <h2>Adding the SSH Key to the Agent</h2> <p></p> <p></p> <p>Since the goal is for passwordless authentication, we're going to be adding our SSH key to the SSH agent, as well as instructing it to use the Keychain (for Mac). If you are using Linux, you might have to look into a comparable solution, such as Seahorse for Ubuntu. For Windows users, you'll need to look up how to use PuTTY and PuTTYgen for this.</p> <p></p> <p></p> <p>If you are on Linux, you will also have to make sure that the SSH agent is started up. In your <code>~/.bashrc</code> file, add the line <code>$(eval ssh-agent) &gt; /dev/null</code> to the end, which should start up the agent.</p> <p></p> <p></p> <p>Now that the SSH agent is started and we have our key set up, add it to the agent with the following command:</p> <p></p> <p></p> <pre class="wp-block-code"><code>ssh-add -K ~/.ssh/id_ed25519</code></pre> <p></p> <p></p> <p>This will prompt you for the passphrase to add it to the agent, and you will subsequently not need to type your password to use this identity file again until the next reboot.</p> <p></p> <p></p> <p>Now, it is time for us to configure our SSH client. Create the file <code>~/.ssh/config</code> with the following command and open it:</p> <p></p> <p></p> <pre class="wp-block-code"><code>touch ~/.ssh/config &amp;&amp; nano ~/.ssh/config</code></pre> <p></p> <p></p> <p>Now, copy the configuration below and paste it in your terminal:</p> <p></p> <p></p> <pre class="wp-block-code"><code>Host *
    UseKeychain yes   # Add this line only if you're on MacOS
    AddKeysToAgent yes
    IdentityFile ~/.ssh/id_ed25519</code></pre> <p></p> <p></p> <p>This will enable you to use the <code>~/.ssh/id_ed25519</code> key for any machine you are attempting to connect with. If you want to create a more specific scope and only use that file for specifically connecting to your raspberry pi, you can set the "Host" field to whatever the hostname you configured in the previous guide. For example, since my Raspberry Pi has a hostname of "steve", I would write my configuration as such:</p> <p></p> <p></p> <pre class="wp-block-code"><code>Host steve.local
    UseKeychain yes
    AddKeysToAgent yes
    IdentityFile ~/.ssh/id_ed25519</code></pre> <p></p> <p></p> <p>The important line for making sure you don't need to type the password almost ever again (for Mac users) is the "UseKeychain" line. This will allow the SSH agent to communicate with your native Keychain, which stores passwords securely on your system.</p> <p></p> <p></p> <h2>Adding the SSH Key to the Raspberry Pi</h2> <p></p> <p></p> <p>Transferring the SSH key to the host (the RasPi) is fairly simple. You can just run the following command, switching "<code>steve.local</code>" for the hostname of your Raspberry Pi.</p> <p></p> <p></p> <pre class="wp-block-code"><code>ssh-copy-id pi@steve.local</code></pre> <p></p> <p></p> <p>You will be prompted for the password, and when you are done your key will be installed on the host system. It handles all of this for you.</p> <p></p> <p></p> <div class="wp-block-image"> <figure class="aligncenter size-large is-resized"><img src="/assets/2021/09/Screen-Shot-2021-09-24-at-8.55.33-AM-1-1024x820.png" alt="" class="wp-image-189" width="513" height="410"/><br/> <figcaption>Copying the SSH key to the server with <code>ssh-copy-id</code></figcaption> </figure> </div> <p></p> <p></p> <h2>Configuring the SSH Server</h2> <p></p> <p></p> <p>Once our key is installed, we just need to configure our server to require a known key, and disable password-based login. To start, make a backup copy of the current configurations with the command</p> <p></p> <p></p> <pre class="wp-block-code"><code>sudo cp /etc/ssh/sshd_config /etc/ssh/sshd_config.default</code></pre> <p></p> <p></p> <p>This will ensure that even if we mess up, we can always just return to the initial configuration that we know worked previously.</p> <p></p> <p></p> <p>To start editing the file, run the command below, which will start up the text editor <code>nano</code>:</p> <p></p> <p></p> <pre class="wp-block-code"><code>sudo nano /etc/ssh/sshd_config</code></pre> <p></p> <p></p> <p><code>nano</code> is a very simple text editor that comes bundled with Raspberry Pi OS. There are some other popular ones, such as <code>vim</code> and my personal favourite, <code>emacs</code>. Ultimately, it's a matter of preference, but for very quick file edits we can use <code>nano</code> very quickly.</p> <p></p> <p></p> <p>You may have noticed that we have had to run the last two commands with <code>sudo</code>, which you might remember from the previous guide that I mentioned is something you should be careful of doing. This is one of the cases where <code>sudo</code> (which stands for "<strong>s</strong>uper <strong>u</strong>ser <strong>do</strong>") is necessary: The SSH server is run as "<code>root</code>" (which is akin to an admin user), so we need to run these commands with elevated permissions (i.e. "running as an administrator") to make them work. The majority of the files that are in the <code>/etc</code> directory will be owned by the "<code>root</code>" user, so you'll need to run commands with <code>sudo</code> to change them.</p> <p></p> <p></p> <p>Now that we can change our configurations, let's start making our SSH server a little more secure.</p> <p></p> <p></p> <ul> <li>Find the line <code>#PermitRootLogin prohibit-password</code> and change it to <code>PermitRootLogin no</code> <ul> <li>This will prevent the user "root" from ever being able to log in to SSH, which is generally desired since that is the user with highest permissions. Good practice is to use an account that has 'sudo' permissions, like our Pi account.</li> </ul> </li> <li>Find the line <code>#PasswordAuthentication yes</code> and change it to <code>PasswordAuthentication no</code> <ul> <li>This will disable the use of passwords and require us to have the SSH key installed.</li> </ul> </li> <li>Find the line <code>#ClientAliveInterval 0</code> and change it to <code>ClientAliveInterval 300</code> <ul> <li>This will let the server check the client every 5 minutes to see if it is active</li> </ul> </li> <li>Find the line <code>#ClientAliveCountMax 3</code> and change it to <code>ClientAliveCountMax 0</code> <ul> <li>This will make it so that if the server determines the client is not active after 5 minutes, it will end the session</li> </ul> </li> <li>At the top of the file, add the line <code>AllowUsers pi</code> <ul> <li>This will make it so that the only user that is allowed to login through SSH is the <code>pi</code> user. If you want to add additional users that can be used to remotely connect, make sure to add them to this line, separated by a space character.</li> </ul> </li> </ul> <p></p> <p></p> <p>When you are finished with these changes, press <code>CTRL+S</code> to save the file and <code>CTRL+X</code> to exit. Finally, we need to restart our SSH server to enable these configurations. You can do it with the following command:</p> <p></p> <p></p> <pre class="wp-block-code"><code>sudo systemctl restart ssh</code></pre> <p></p> <p></p> <p>One last thing before we close out of our session! Open up a new terminal window (while leaving the current one open) and try to connect to the Raspberry Pi</p> <p></p> <p></p> <pre class="wp-block-code"><code>ssh pi@steve.local</code></pre> <p></p> <p></p> <p>If you were able to connect without having to provide the password for the <code>pi</code> account, you are done! The Raspberry Pi will now allow you to log in without providing any password, while still allowing for protection against unauthorized access from any other machine.</p> <p></p> <p></p> <p>To add more keys, you can do it in one of a few ways. If you would like to add more keys from the current machine, just create a new key and run <code>ssh-copy-id</code> again. Alternatively, if you want to add a key from a different machine, you can either:</p> <p></p> <p></p> <ul> <li>Revert back to the default configurations temporarily to add the new key: <ul> <li>Make a backup of your current configurations (<code>sudo mv /etc/ssh/sshd_config /etc/ssh/sshd_config.bak</code>)</li> <li>Reload the default configurations (<code>sudo cp /etc/ssh/sshd_config.default /etc/ssh/sshd_config</code>)</li> <li>Restart the SSH server (<code>sudo systemctl restart ssh</code>)</li> <li>Add the new key the same way you did before (<code>ssh-copy-id pi@steve.local</code>)</li> <li>Delete the old default configuration (<code>sudo rm /etc/ssh/sshd_config</code>)</li> <li>Restore your proper settings (<code>sudo cp /etc/ssh/sshd_config.bak /etc/ssh/sshd_config</code>)</li> <li>Restart the SSH server to restore your configs (<code>sudo systemctl restart ssh</code>)</li> <li>This has the drawback that it requires you to lower the security of your pi, albeit just temporarily</li> </ul> </li> <li>Or, you can send yourself the public key of the new machine to the one that can access the Raspberry Pi and copy it over: <ul> <li>Send yourself the <code>.pub</code> file somehow. Email is fine, as is using iCloud/Google Drive/OneDrive/etc</li> <li>Save it to your home directory with the name <code>id_ed25519_&lt;machine_name&gt;</code> where <code>&lt;machine_name&gt;</code> is a name you choose for your computer</li> <li>Run the following command:</li> </ul> </li> </ul> <p></p> <p></p> <pre class="wp-block-code"><code>cat ~/id_ed25519_&lt;machine_name&gt;.pub | ssh pi@steve.local "cat &gt;&gt; ~/.ssh/authorized_keys"</code></pre> <p></p> <p></p> <p>This will copy the public key to the Raspberry Pi's authorized keys without having to change your settings. Once the new key is installed on the system with the command above, the new machine will be able to log in!</p> <p></p> <p></p> <h2>Wrapping Up</h2> <p></p> <p></p> <p>In this guide we went over a number of key concepts. We covered:</p> <p></p> <p></p> <ul> <li>Basic concepts of authentication</li> <li>Basic concepts of cryptography/signing</li> <li>How to create an SSH key</li> <li>How to add the SSH key to the <code>ssh-agent</code></li> <li>How to configure the SSH client to use Keychain</li> <li>How to install an SSH key to your Raspberry Pi server</li> <li>How to configure the SSH server</li> <li>How to install new keys to the SSH server</li> <li>How to restart<span style="color: initial;"> </span>the ssh server so it picks up our new configs</li> </ul> <p></p> <p></p> <p>In the next guide, we'll go over <a href="https://natalia.dev/2021/09/25/ssh-multifactor-authentication-with-google-authenticator-and-yubikey/" data-type="URL" data-id="https://natalia.dev/2021/09/25/ssh-multifactor-authentication-with-google-authenticator-and-yubikey/" target="_blank" rel="noreferrer noopener">how to enable two-factor authentication</a> as part of connecting to our Raspberry Pi through SSH. While this is not necessarily required, it is a simple and quick way to add extra protection to our sessions.</p> <p></p>]]></content><author><name>Natalia Maximo</name></author><category term="Guide"/><category term="authentication"/><category term="cryptography"/><category term="raspberry pi"/><category term="ssh"/><summary type="html"><![CDATA[In the last blog post, we covered how to set up a headless Raspberry Pi, and we connected to our Raspberry Pi by using the Secure SHell (SSH) protocol. This is a really good protocol for connecting to servers, and is used pretty ubiquitously in the industry. However, with our current setup, our Raspberry Pi still suffers from one crucial issue when connecting through SSH: it relies on a password. Passwords are something I have hated for quite some time. They are a simple (bad) solution to the complex problem of authentication. More often than not, they are easy to guess, regularly reused, and too easily we as human beings can be tricked into giving them away. I believe it's important to understand why you should use SSH keys, and have at least some understanding as to how it works. I have included as part of this guide a quick primer on authentication and a very quick primer on public key cryptography. These are not important to setting up passwordless SSH access, so feel free to skip it if you already understand these concepts, or don't feel the need to read through them. A Quick Primer on Authentication There are three main ways you can be authenticated as a user: Something you know Something you have Something you are Passwords would fall into the first category: something you know. Unfortunately, if your authentication relies only on something you know, it is often easy to steal or in some other way have it be compromised. One common way that this happens is through leaked passwords: If a service you once signed up for with the same password has their database be stolen, and they didn't take proper steps to secure that database, your password (regardless of how good it might be) could be compromised. If you have an iPhone, or many of the more recent Android devices, you are likely familiar with the third category: with Face ID the iPhone is able to evaluate your face and determine if it is you, and with Touch ID (and the Android fingerprint sensors) your phone is able to use your fingerprint to determine identity. You might also be familiar with the second category. It is becoming increasingly common for services to use multi-factor authentication, which uses more than one item to secure your account. Usually, this is something like a one-time password provided by applications such as Google Authenticator, Authy, or Microsoft Authenticator. A different method that uses the same basic principle is to use a hardware-based key, such as a YubiKey. When I was a Google intern, they provided hardware keys to secure our employee accounts, and it has been very successful in preventing account takeovers. The goal of this guide is to move our SSH authentication from a password (something you know, which can be compromised) to something you have (your computer). The way we do this is through something called "Public Key Cryptography" A Very Quick Primer on Public-Key Cryptography I won't go over public-key cryptography in a lot of detail in this post, since it's a very complex topic that I could not hope to do justice in a single post, let alone a section of one. The most important thing to know at a high level is that public key cryptography uses a pair of very large numbers (which we call keys), one of which you must keep secret (the private key), and one of which you can give to others (the public key). With your private key, you can sign some information to confirm that it came from you, and anyone that has a copy of your public key can verify the signature. This means that keeping the private key secret is very important, since anyone who has access to it can effectively impersonate you. However, unlike passwords, you never actually provide the private key to a service you are using, which means you can use the same pair of keys as much as you would like. Since your public key can be published anywhere safely (assuming your private key is secret), it can never render your account vulnerable if it is stolen from a service you use. To authenticate with our Raspberry Pi, we will be using the ED25519 signing scheme, which is based on something called "Elliptic-curve Cryptography". If you're familiar with some amount of cryptography, you might be familiar with RSA, which is a commonly-used system, and might be wondering why we would use a different system. RSA is not considered to be secure for key sizes below 2048 bits, and compared to ED25519 it is substantially slower and has a substantially larger key size. ED25519 is still considered to be computationally secure, so it provides comparable protection (in that it cannot be broken, to our knowledge, with existing and expected near-future technology within the lifetime of the universe). Why Should I Care? That is a very good question. The first reason why you might care is that by switching over to using keys you will be able to log in without having to type a password each time. The convenience factor is the primary reason for most people. As an added perk, your system also becomes safer: it is easier to steal a password than it is to steal a specific file on your computer. As a consequence, only the machines that you've previously uploaded SSH keys from will be able to connect to your RasPi. Creating your SSH Key The very first step in setting up public key based authentication is to actually create the key. If you're on Unix or Mac OS (this also includes using WSL/WSL 2 on Windows), you can run the following command to start the key creation process: ssh-keygen -t ed25519 Select the file name or leave it blank to use the default filename (~/.ssh/id_ed25519). Then, set a passphrase for that key. This passphrase will be used to "lock" your private key, so that even if it gets stolen, the attacker would need to know that passphrase to access the key and subsequently access your Raspberry Pi. Generating an SSH Key This will generate two files: ~/.ssh/id_ed25519 and ~/.ssh/id_ed25519.pub. As you might guess, the .pub file is the public key, and the file with no extension is the private key. Adding the SSH Key to the Agent Since the goal is for passwordless authentication, we're going to be adding our SSH key to the SSH agent, as well as instructing it to use the Keychain (for Mac). If you are using Linux, you might have to look into a comparable solution, such as Seahorse for Ubuntu. For Windows users, you'll need to look up how to use PuTTY and PuTTYgen for this. If you are on Linux, you will also have to make sure that the SSH agent is started up. In your ~/.bashrc file, add the line $(eval ssh-agent) &gt; /dev/null to the end, which should start up the agent. Now that the SSH agent is started and we have our key set up, add it to the agent with the following command: ssh-add -K ~/.ssh/id_ed25519 This will prompt you for the passphrase to add it to the agent, and you will subsequently not need to type your password to use this identity file again until the next reboot. Now, it is time for us to configure our SSH client. Create the file ~/.ssh/config with the following command and open it: touch ~/.ssh/config &amp;&amp; nano ~/.ssh/config Now, copy the configuration below and paste it in your terminal: Host * UseKeychain yes # Add this line only if you're on MacOS AddKeysToAgent yes IdentityFile ~/.ssh/id_ed25519 This will enable you to use the ~/.ssh/id_ed25519 key for any machine you are attempting to connect with. If you want to create a more specific scope and only use that file for specifically connecting to your raspberry pi, you can set the "Host" field to whatever the hostname you configured in the previous guide. For example, since my Raspberry Pi has a hostname of "steve", I would write my configuration as such: Host steve.local UseKeychain yes AddKeysToAgent yes IdentityFile ~/.ssh/id_ed25519 The important line for making sure you don't need to type the password almost ever again (for Mac users) is the "UseKeychain" line. This will allow the SSH agent to communicate with your native Keychain, which stores passwords securely on your system. Adding the SSH Key to the Raspberry Pi Transferring the SSH key to the host (the RasPi) is fairly simple. You can just run the following command, switching "steve.local" for the hostname of your Raspberry Pi. ssh-copy-id pi@steve.local You will be prompted for the password, and when you are done your key will be installed on the host system. It handles all of this for you. Copying the SSH key to the server with ssh-copy-id Configuring the SSH Server Once our key is installed, we just need to configure our server to require a known key, and disable password-based login. To start, make a backup copy of the current configurations with the command sudo cp /etc/ssh/sshd_config /etc/ssh/sshd_config.default This will ensure that even if we mess up, we can always just return to the initial configuration that we know worked previously. To start editing the file, run the command below, which will start up the text editor nano: sudo nano /etc/ssh/sshd_config nano is a very simple text editor that comes bundled with Raspberry Pi OS. There are some other popular ones, such as vim and my personal favourite, emacs. Ultimately, it's a matter of preference, but for very quick file edits we can use nano very quickly. You may have noticed that we have had to run the last two commands with sudo, which you might remember from the previous guide that I mentioned is something you should be careful of doing. This is one of the cases where sudo (which stands for "super user do") is necessary: The SSH server is run as "root" (which is akin to an admin user), so we need to run these commands with elevated permissions (i.e. "running as an administrator") to make them work. The majority of the files that are in the /etc directory will be owned by the "root" user, so you'll need to run commands with sudo to change them. Now that we can change our configurations, let's start making our SSH server a little more secure. Find the line #PermitRootLogin prohibit-password and change it to PermitRootLogin no This will prevent the user "root" from ever being able to log in to SSH, which is generally desired since that is the user with highest permissions. Good practice is to use an account that has 'sudo' permissions, like our Pi account. Find the line #PasswordAuthentication yes and change it to PasswordAuthentication no This will disable the use of passwords and require us to have the SSH key installed. Find the line #ClientAliveInterval 0 and change it to ClientAliveInterval 300 This will let the server check the client every 5 minutes to see if it is active Find the line #ClientAliveCountMax 3 and change it to ClientAliveCountMax 0 This will make it so that if the server determines the client is not active after 5 minutes, it will end the session At the top of the file, add the line AllowUsers pi This will make it so that the only user that is allowed to login through SSH is the pi user. If you want to add additional users that can be used to remotely connect, make sure to add them to this line, separated by a space character. When you are finished with these changes, press CTRL+S to save the file and CTRL+X to exit. Finally, we need to restart our SSH server to enable these configurations. You can do it with the following command: sudo systemctl restart ssh One last thing before we close out of our session! Open up a new terminal window (while leaving the current one open) and try to connect to the Raspberry Pi ssh pi@steve.local If you were able to connect without having to provide the password for the pi account, you are done! The Raspberry Pi will now allow you to log in without providing any password, while still allowing for protection against unauthorized access from any other machine. To add more keys, you can do it in one of a few ways. If you would like to add more keys from the current machine, just create a new key and run ssh-copy-id again. Alternatively, if you want to add a key from a different machine, you can either: Revert back to the default configurations temporarily to add the new key: Make a backup of your current configurations (sudo mv /etc/ssh/sshd_config /etc/ssh/sshd_config.bak) Reload the default configurations (sudo cp /etc/ssh/sshd_config.default /etc/ssh/sshd_config) Restart the SSH server (sudo systemctl restart ssh) Add the new key the same way you did before (ssh-copy-id pi@steve.local) Delete the old default configuration (sudo rm /etc/ssh/sshd_config) Restore your proper settings (sudo cp /etc/ssh/sshd_config.bak /etc/ssh/sshd_config) Restart the SSH server to restore your configs (sudo systemctl restart ssh) This has the drawback that it requires you to lower the security of your pi, albeit just temporarily Or, you can send yourself the public key of the new machine to the one that can access the Raspberry Pi and copy it over: Send yourself the .pub file somehow. Email is fine, as is using iCloud/Google Drive/OneDrive/etc Save it to your home directory with the name id_ed25519_&lt;machine_name&gt; where &lt;machine_name&gt; is a name you choose for your computer Run the following command: cat ~/id_ed25519_&lt;machine_name&gt;.pub | ssh pi@steve.local "cat &gt;&gt; ~/.ssh/authorized_keys" This will copy the public key to the Raspberry Pi's authorized keys without having to change your settings. Once the new key is installed on the system with the command above, the new machine will be able to log in! Wrapping Up In this guide we went over a number of key concepts. We covered: Basic concepts of authentication Basic concepts of cryptography/signing How to create an SSH key How to add the SSH key to the ssh-agent How to configure the SSH client to use Keychain How to install an SSH key to your Raspberry Pi server How to configure the SSH server How to install new keys to the SSH server How to restart the ssh server so it picks up our new configs In the next guide, we'll go over how to enable two-factor authentication as part of connecting to our Raspberry Pi through SSH. While this is not necessarily required, it is a simple and quick way to add extra protection to our sessions.]]></summary></entry><entry><title type="html">Setting Up Headless Raspberry Pi with Raspberry Pi OS</title><link href="https://natalia.dev/2021/09/23/setting-up-headless-raspberry-pi-with-raspberry-pi-os/" rel="alternate" type="text/html" title="Setting Up Headless Raspberry Pi with Raspberry Pi OS"/><published>2021-09-23T21:00:35+00:00</published><updated>2021-09-23T21:00:35+00:00</updated><id>https://natalia.dev/2021/09/23/setting-up-headless-raspberry-pi-with-raspberry-pi-os</id><content type="html" xml:base="https://natalia.dev/2021/09/23/setting-up-headless-raspberry-pi-with-raspberry-pi-os/"><![CDATA[<p>You might’ve heard before about the <a href="https://www.raspberrypi.org">Raspberry Pi</a>, a credit-card sized computer that lets individuals everywhere learn how to code, how to create different hardware-based projects, and bring affordable computing to areas where we weren’t able to do so before. You might also know someone who has set up a network file share, or a network-wide adblocker with one of these, and now you’re curious as to how to set one up yourself. Or, if you’re anything like me, you opened up your desk drawer and saw that you own one from a few years back, and you want to start putting it to good use.</p> <h2 id="why-headless">Why headless?</h2> <p>While you can definitely use the Raspberry Pi as a desktop (which makes a fantastic first computer for a young tech enthusiast), I think one of the areas where the RasPi thrives is in being used as a very affordable, small home server. You can set it as a file share, an ad blocker, a backup server, or even a media streaming server! For all these purposes, it makes more sense to run the RasPi as a headless machine (which does not have a desktop environment installed in it). This will save you space, memory, and install time.</p> <h2 id="getting-started">Getting Started</h2> <p>To follow along to this guide, you will need the following things:</p> <ol> <li>A full-sized Raspberry Pi. I use the Raspberry Pi 3 Model B, but this should work for all models, other than the Zero, Zero W, and the Pico.</li> <li>A suitable power supply for your Raspberry Pi</li> <li>A MicroSD card. I’m using an 8 GB one I had laying around, but I’d recommend using a bigger one if you’re planning on installing lots of things on it</li> <li>A MicroSD adapter. This can be a MicroSD to USB, or MicroSD to SD adapter, provided that your computer can read those</li> <li>An ethernet cable to connect the RasPi to your router</li> <li>A computer to flash the image onto the SD card</li> </ol> <p>All of the above (except the computer to flash the image and the ethernet cable) should be available through one of the various kits that you can purchase. Some kits even include a pre-installed version of the Raspberry Pi OS in their SD card, though it most likely would include the desktop version.</p> <h2 id="flashing-the-image-onto-an-sd-card">Flashing the Image onto an SD Card</h2> <p>You can install the Raspberry Pi OS on your RasPi’s SD card in a couple of different ways. I’ve always previously used <a href="https://www.balena.io/etcher/">belenaEtcher</a> to flash the images, since I’ve used it for more than just the Pi, but I was curious when I saw on the website that they now have a <a href="https://www.raspberrypi.org/software/">Raspberry Pi Imager</a> that can take a lot of the heavy work out of the actual installation, so I decided to go with that.</p> <p>Since we’re going to be running our Raspberry Pi as a headless machine, we want to make sure not to install a desktop environment. Typically, installing the “desktop” version of the OS will mean that you get an actual GUI, which can take up resources that we’re not going to be using. Instead, we want to pick the “lite”, or “server” versions of the OS since those typically only come with a command-line interface. When you open up the Imager, pick <strong>Raspberry Pi OS (Other)</strong>, and select <strong>Raspberry Pi OS Lite (32-bit)</strong>.</p> <p><img src="/assets/2021/09/Screen-Shot-2021-09-23-at-9.26.14-AM.png" alt="Selecting the proper OS"/></p> <p>If you’re familiar with the specs of your board you might have noticed that if you have a Raspberry Pi 3 or 4, your device actually has a 64-bit processor. However, right now the Raspberry Pi OS only supports 32-bit images, with the 64-bit version out as a <a href="https://www.raspberrypi.org/blog/latest-raspberry-pi-os-update-may-2020/">beta</a>.</p> <p>Once you have the OS picked out, just make sure you pick the correct disk to flash it on. If you have multiple SD cards, USB drives, etc. connected to your machine, you <em>definitely</em> want to avoid writing over the wrong one. Since I’ve only got my 8 GB MicroSD card connected, this wasn’t much of a problem for me. Once you’re ready to go, just click “Write” and select “Yes” on the dialog when it asks if you’re sure.</p> <p><img src="/assets/2021/09/Screen-Shot-2021-09-23-at-9.44.10-AM.png" alt="Writing to the SD card from Raspberry Pi Imager"/></p> <p>Once it is finished writing, the SD card will most likely be ejected from your system since the Imager thinks it’s ready to go. However, there’s one final step missing before we can pop the card into our RasPi: Enabling SSH so we can connect to it without having to connect to a monitor/keyboard.</p> <h2 id="enabling-ssh">Enabling SSH</h2> <p>I’m not going to go too in-depth with <a href="https://en.wikipedia.org/wiki/Secure_Shell">what SSH actually is</a>. The important part is this: it stands for <strong>S</strong>ecure <strong>SH</strong>ell, and it is a way to (you guessed it) securely send commands to your shell.</p> <p>To enable SSH on your RasPi on startup, you need to add a blank file called “ssh” to the Raspberry Pi’s boot image. If your SD card was ejected, just remove it and put it back in. I’m on a MacBook, so I can open my Terminal application (I use iTerm2) and type in the following command:</p> <p><code class="language-plaintext highlighter-rouge">touch /Volumes/boot/ssh</code></p> <p>This command will create the blank file on the “boot” volume. Confirm that it is actually in the SD card, and eject it when you’re done.</p> <p><img src="/assets/2021/09/Screen-Shot-2021-09-23-at-10.16.48-AM.png" alt="The new &quot;ssh&quot; file on the drive&quot;"/></p> <p>That’s it! Now, when we plug in our Raspberry Pi, it will start the SSH server which will let us connect to it remotely from the get-go. Put the MicroSD card in your RasPi, connect it to power, and plug in the ethernet on your RasPi and your router to connect it to your local network.</p> <h2 id="connecting-to-the-raspi-over-ssh">Connecting to the RasPi over SSH</h2> <p>The Raspberry Pi uses a service called <a href="https://en.wikipedia.org/wiki/Avahi_(software)">Avahi</a> for <a href="https://en.wikipedia.org/wiki/Multicast_DNS">mDNS</a>, which will try to make it easy for you to connect. If those words sound weird and scary for you, don’t worry about it: the general gist is that you should be able to connect without having to actually know the IP address of your RasPi.</p> <p>Open up your Terminal application (if you’re on Linux or Mac OS), or your SSH client (such as PuTTY for Windows), and connect to <code class="language-plaintext highlighter-rouge">pi@raspberrypi.local</code>. On Mac and Linux, you can do this with the following command:</p> <p><code class="language-plaintext highlighter-rouge">ssh pi@raspberrypi.local</code></p> <p>Your terminal might say that it cannot determine the authenticity of the server. This is expected since this is the very first time you are connecting to this machine. Type “yes” and it will attempt to connect, and ask you for the password. The default password for the user <code class="language-plaintext highlighter-rouge">pi</code> is <code class="language-plaintext highlighter-rouge">raspberry</code>. Type it in, and it should show you the Raspberry Pi prompt, as well as a warning to change the default password.</p> <p><img src="/assets/2021/09/Screen-Shot-2021-09-23-at-10.42.09-AM.png" alt="Terminal prompt connecting through SSH to the Raspberry Pi"/></p> <p>You might assume that, since it is only in your local network, it is fine to keep the default password for the Raspberry Pi. While it is true that you should have a firewall from your router, it is always good practice to change all default passwords, since you never know what can happen. Maybe you share your network with other people in the household, or maybe someone can guess your wifi password, or through some other means they can gain access. Or, maybe, you want to be able to connect to your raspberry pi from anywhere in the world and want to open it up to connect from outside your home. In all these cases, we should add some security. <span><i style="font-weight: bold;">Make sure </i><span style="font-weight: 600;"><i>y</i></span><strong><em>ou change the password immediately</em></strong>.</span> You can do this by typing <code class="language-plaintext highlighter-rouge">passwd</code> on the Raspberry Pi prompt. Note, the password won’t be visible on the terminal while you type it.</p> <p><img src="/assets/2021/09/Screen-Shot-2021-09-23-at-10.53.34-AM.png" alt="Changing password on the raspberry pi"/></p> <p>Now it’s time to actually configure the settings on our Raspberry Pi!</p> <h2 id="configuring-our-raspberry-pi">Configuring our Raspberry Pi</h2> <p>The Raspberry Pi OS comes with a nice tool for setting up a lot of the basic settings. To start it up, run the following command on your RasPi shell:</p> <p><code class="language-plaintext highlighter-rouge">sudo raspi-config</code></p> <p>This command will run with elevated permissions, which we need to change system settings, but you should always be careful of when you are using “sudo”. You should see your terminal window change onto a menu, like the screenshot below. Since we’re running it headless, we can definitely ignore the <strong>Display Options</strong> menu and a handful of other configurations.</p> <div class="wp-block-image"> <figure class="aligncenter size-full"><img src="/assets/2021/09/Screen-Shot-2021-09-23-at-11.02.48-AM.png" alt="" class="wp-image-177"/><br/> <figcaption>The Raspi-Config menu. You can navigate through this menu using the arrow keys, the enter key, and the tab key.</figcaption> </figure> </div> <h2 id="system-options">System Options</h2> <p><img src="/assets/2021/09/Screen-Shot-2021-09-23-at-11.06.43-AM.png" alt="The system options menu."/></p> <p>Some settings on this menu you might want to change:</p> <ol> <li><strong>Wireless LAN </strong>- If you’re hoping to use this Raspberry Pi through wifi, you can set the Wifi information by going through the wizard. You’ll need to know the actual name of your network and the passphrase for it. <ul> <li>Personally, I recommend leaving the Raspberry Pi on ethernet since it is a lot more stable than wifi, but if you need to connect from somewhere you can’t run a cable to, wifi makes sense.</li> </ul> </li> <li><strong>Password</strong> - If you haven’t yet changed your password, <strong>this is the time</strong>. You can change your password from this menu.</li> <li><strong>Hostname</strong> - If you’re going to have more raspberry pis in your network, changing the hostname is a good idea. I like to give my RasPis a nickname, so I called mine “<strong>Steve</strong>”. If you’re using it for a specific use (such as <strong><a rel="noreferrer noopener" href="https://pi-hole.net" target="_blank">pihole</a></strong>), giving it a meaningful name might also be a good idea.</li> <li><strong>Boot / Auto Login</strong> - If you installed the full graphical interface, that’s okay. If you mostly want to use it as a headless machine, but sometimes want to be able to boot up the GUI, you can set to boot into command line. I’d recommend making sure that you <strong>do not boot with autologin</strong>, for security reasons.</li> <li><strong>Network at Boot</strong> - If your RasPi is always being used for network-related tasks, it might interest you to make sure that your Raspberry Pi is only booted when there is a network connection present.</li> </ol> <h2 id="interface-options">Interface Options</h2> <p><img src="/assets/2021/09/Screen-Shot-2021-09-23-at-11.22.37-AM.png" alt="Interface options submenu in raspberry pi configuration"/></p> <p>It is good practice to <strong>disable all interfaces you do not need</strong>. Since I’m not using my RasPi for messing with any prototyping or sensing, and I don’t want a graphical environment, I <strong>disable every interface other than SSH</strong>.</p> <p>While it’s unlikely that anyone would break into my home and add an SPI device or a camera to my raspberry pi without me noticing, disabling these kernel modules from being loaded prevents any problems from occurring due to bugs or vulnerabilities that could eventually be introduced or discovered in these modules unexpectedly.</p> <h2 id="localization-options">Localization Options</h2> <p><img src="/assets/2021/09/Screen-Shot-2021-09-23-at-12.26.43-PM.png" alt="Localization options for the Raspberry Pi"/></p> <p>As far as localization goes, I personally only set the timezone. The Pi is usually pretty good at picking up the other things, and since English is my main language I don’t have to really change much else.</p> <p>If you’re planning on using wifi, you can set your WLAN country in this menu, but you’ll also be asked that already when you configure wifi on the device so you should not need to set it independently.</p> <h2 id="advanced-options">Advanced Options</h2> <p><img src="/assets/2021/09/Screen-Shot-2021-09-23-at-12.25.17-PM.png" alt="Advanced options for the Raspi-Config tool"/></p> <p>The most critical option to select here is “<strong>Expand Filesystem</strong>”. The reason for that is that flashing the image on often does not expand it to include the entire card size, and you’ll want to be able to use all of the space on that card (since presumably you won’t be using it for anything else at this point).</p> <p>If you plan on using things that require you to know the network interface, the “<strong>Network Interface Names</strong>” option should help you, but your mileage may vary. In my case, when I set “predictable network interface names” to be enabled, it made the ethernet interface be a very long string, whereas disabling it set the interface name to “eth0”, which was what I had expected.</p> <h2 id="wrapping-up">Wrapping Up</h2> <p>Once you’re finished with these settings, you can navigate to “Finish” and press <strong>Enter</strong>. It will prompt you for reboot, which is exactly what we need to do considering that we changed the partition size on our SD card.</p> <p>After the Pi finishes rebooting, you’re all set! You should now be able to SSH into your raspberry pi whenever you’d like from your local network.</p> <p>As a review, this is what we’ve gone over in this guide:</p> <ol> <li>Using the Raspberry Pi Imager to install a Lite version of the Raspberry Pi OS on a micro SD card</li> <li>Enabling the SSH server on the Raspberry Pi at boot time</li> <li>Connecting to the Raspberry Pi over SSH through Ethernet</li> <li>Changing the password on a user account on the Raspberry Pi</li> <li>Configuring system settings on the Raspberry Pi with raspi-config</li> </ol> <p>For the next guide, we will be going over how to set up passwordless authentication for your Raspberry Pi, which will allow us to connect through <a href="/2021/09/24/ssh-with-no-password-using-public-key-cryptography">how to connect with SSH without having to type the password in the terminal every time.</a></p>]]></content><author><name>Natalia Maximo</name></author><category term="Guide"/><category term="guide"/><category term="raspberry pi"/><category term="setup"/><category term="walkthrough"/><summary type="html"><![CDATA[You might’ve heard before about the Raspberry Pi, a credit-card sized computer that lets individuals everywhere learn how to code, how to create different hardware-based projects, and bring affordable computing to areas where we weren’t able to do so before. You might also know someone who has set up a network file share, or a network-wide adblocker with one of these, and now you’re curious as to how to set one up yourself. Or, if you’re anything like me, you opened up your desk drawer and saw that you own one from a few years back, and you want to start putting it to good use.]]></summary></entry></feed>