Setting Up Headless Raspberry Pi with Raspberry Pi OS
You might’ve heard before about the Raspberry Pi, a credit-card sized computer that lets individuals everywhere learn how to code, how to create different hardware-based projects, and bring affordable computing to areas where we weren’t able to do so before. You might also know someone who has set up a network file share, or a network-wide adblocker with one of these, and now you’re curious as to how to set one up yourself. Or, if you’re anything like me, you opened up your desk drawer and saw that you own one from a few years back, and you want to start putting it to good use.
Why headless?
While you can definitely use the Raspberry Pi as a desktop (which makes a fantastic first computer for a young tech enthusiast), I think one of the areas where the RasPi thrives is in being used as a very affordable, small home server. You can set it as a file share, an ad blocker, a backup server, or even a media streaming server! For all these purposes, it makes more sense to run the RasPi as a headless machine (which does not have a desktop environment installed in it). This will save you space, memory, and install time.
Getting Started
To follow along to this guide, you will need the following things:
- A full-sized Raspberry Pi. I use the Raspberry Pi 3 Model B, but this should work for all models, other than the Zero, Zero W, and the Pico.
- A suitable power supply for your Raspberry Pi
- A MicroSD card. I’m using an 8 GB one I had laying around, but I’d recommend using a bigger one if you’re planning on installing lots of things on it
- A MicroSD adapter. This can be a MicroSD to USB, or MicroSD to SD adapter, provided that your computer can read those
- An ethernet cable to connect the RasPi to your router
- A computer to flash the image onto the SD card
All of the above (except the computer to flash the image and the ethernet cable) should be available through one of the various kits that you can purchase. Some kits even include a pre-installed version of the Raspberry Pi OS in their SD card, though it most likely would include the desktop version.
Flashing the Image onto an SD Card
You can install the Raspberry Pi OS on your RasPi’s SD card in a couple of different ways. I’ve always previously used belenaEtcher to flash the images, since I’ve used it for more than just the Pi, but I was curious when I saw on the website that they now have a Raspberry Pi Imager that can take a lot of the heavy work out of the actual installation, so I decided to go with that.
Since we’re going to be running our Raspberry Pi as a headless machine, we want to make sure not to install a desktop environment. Typically, installing the “desktop” version of the OS will mean that you get an actual GUI, which can take up resources that we’re not going to be using. Instead, we want to pick the “lite”, or “server” versions of the OS since those typically only come with a command-line interface. When you open up the Imager, pick Raspberry Pi OS (Other), and select Raspberry Pi OS Lite (32-bit).
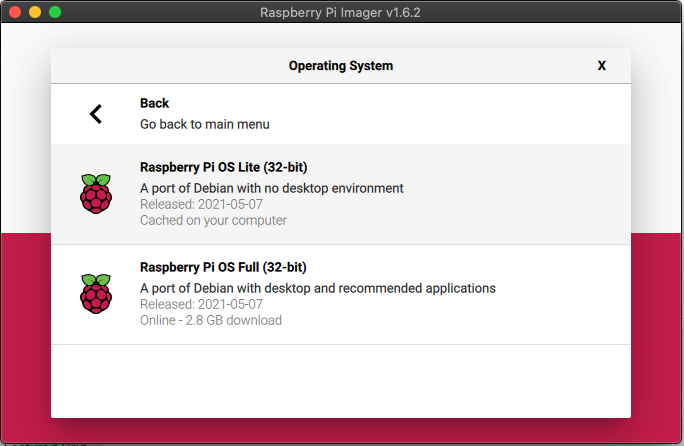
If you’re familiar with the specs of your board you might have noticed that if you have a Raspberry Pi 3 or 4, your device actually has a 64-bit processor. However, right now the Raspberry Pi OS only supports 32-bit images, with the 64-bit version out as a beta.
Once you have the OS picked out, just make sure you pick the correct disk to flash it on. If you have multiple SD cards, USB drives, etc. connected to your machine, you definitely want to avoid writing over the wrong one. Since I’ve only got my 8 GB MicroSD card connected, this wasn’t much of a problem for me. Once you’re ready to go, just click “Write” and select “Yes” on the dialog when it asks if you’re sure.
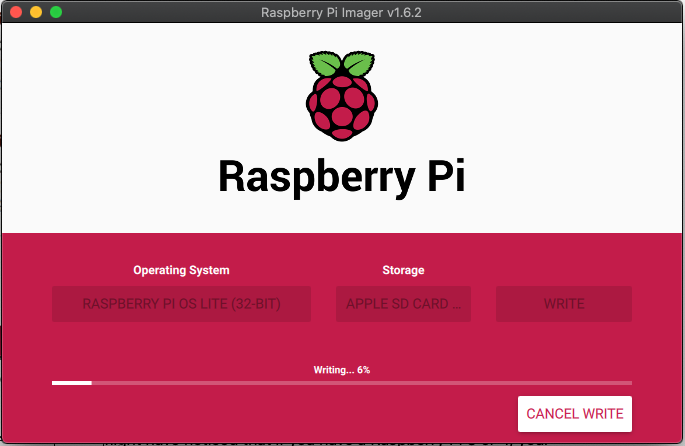
Once it is finished writing, the SD card will most likely be ejected from your system since the Imager thinks it’s ready to go. However, there’s one final step missing before we can pop the card into our RasPi: Enabling SSH so we can connect to it without having to connect to a monitor/keyboard.
Enabling SSH
I’m not going to go too in-depth with what SSH actually is. The important part is this: it stands for Secure SHell, and it is a way to (you guessed it) securely send commands to your shell.
To enable SSH on your RasPi on startup, you need to add a blank file called “ssh” to the Raspberry Pi’s boot image. If your SD card was ejected, just remove it and put it back in. I’m on a MacBook, so I can open my Terminal application (I use iTerm2) and type in the following command:
touch /Volumes/boot/ssh
This command will create the blank file on the “boot” volume. Confirm that it is actually in the SD card, and eject it when you’re done.
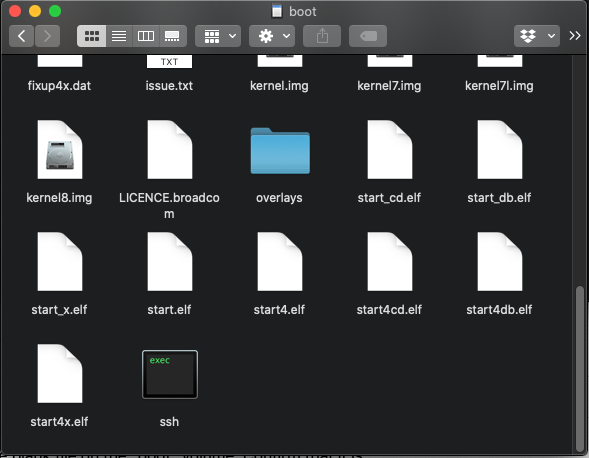
That’s it! Now, when we plug in our Raspberry Pi, it will start the SSH server which will let us connect to it remotely from the get-go. Put the MicroSD card in your RasPi, connect it to power, and plug in the ethernet on your RasPi and your router to connect it to your local network.
Connecting to the RasPi over SSH
The Raspberry Pi uses a service called Avahi for mDNS, which will try to make it easy for you to connect. If those words sound weird and scary for you, don’t worry about it: the general gist is that you should be able to connect without having to actually know the IP address of your RasPi.
Open up your Terminal application (if you’re on Linux or Mac OS), or your SSH client (such as PuTTY for Windows), and connect to pi@raspberrypi.local. On Mac and Linux, you can do this with the following command:
ssh pi@raspberrypi.local
Your terminal might say that it cannot determine the authenticity of the server. This is expected since this is the very first time you are connecting to this machine. Type “yes” and it will attempt to connect, and ask you for the password. The default password for the user pi is raspberry. Type it in, and it should show you the Raspberry Pi prompt, as well as a warning to change the default password.
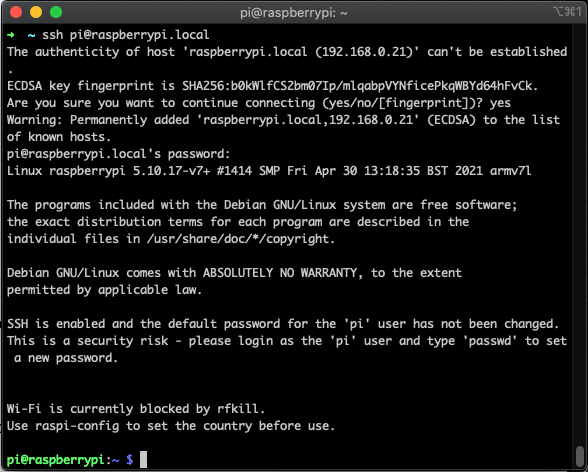
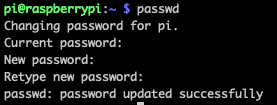
You might assume that, since it is only in your local network, it is fine to keep the default password for the Raspberry Pi. While it is true that you should have a firewall from your router, it is always good practice to change all default passwords, since you never know what can happen. Maybe you share your network with other people in the household, or maybe someone can guess your wifi password, or through some other means they can gain access. Or, maybe, you want to be able to connect to your raspberry pi from anywhere in the world and want to open it up to connect from outside your home. In all these cases, we should add some security. Make sure you change the password immediately. You can do this by typing passwd on the Raspberry Pi prompt. Note, the password won’t be visible on the terminal while you type it.
Now it’s time to actually configure the settings on our Raspberry Pi!
Configuring our Raspberry Pi
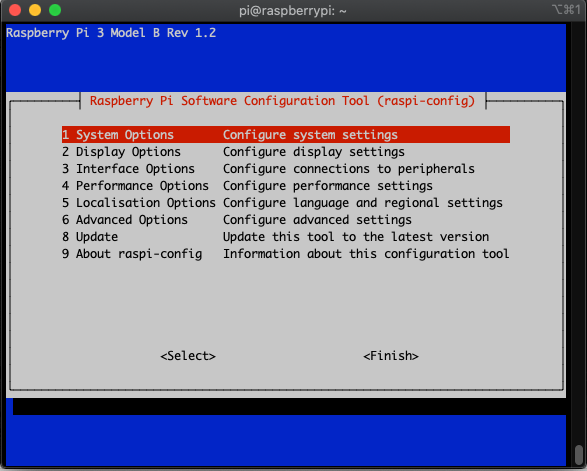
The Raspberry Pi OS comes with a nice tool for setting up a lot of the basic settings. To start it up, run the following command on your RasPi shell:
sudo raspi-config
This command will run with elevated permissions, which we need to change system settings, but you should always be careful of when you are using “sudo”. You should see your terminal window change onto a menu, like the screenshot below. Since we’re running it headless, we can definitely ignore the Display Options menu and a handful of other configurations.
System Options
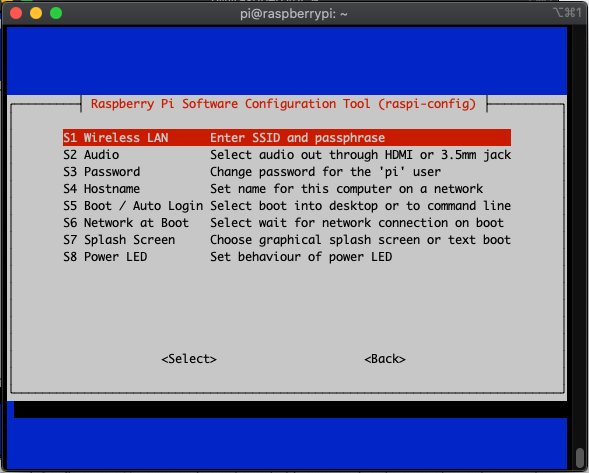
Some settings on this menu you might want to change:
- Wireless LAN - If you’re hoping to use this Raspberry Pi through wifi, you can set the Wifi information by going through the wizard. You’ll need to know the actual name of your network and the passphrase for it.
- Personally, I recommend leaving the Raspberry Pi on ethernet since it is a lot more stable than wifi, but if you need to connect from somewhere you can’t run a cable to, wifi makes sense.
- Password - If you haven’t yet changed your password, this is the time. You can change your password from this menu.
- Hostname - If you’re going to have more raspberry pis in your network, changing the hostname is a good idea. I like to give my RasPis a nickname, so I called mine “Steve”. If you’re using it for a specific use (such as pihole), giving it a meaningful name might also be a good idea.
- Boot / Auto Login - If you installed the full graphical interface, that’s okay. If you mostly want to use it as a headless machine, but sometimes want to be able to boot up the GUI, you can set to boot into command line. I’d recommend making sure that you do not boot with autologin, for security reasons.
- Network at Boot - If your RasPi is always being used for network-related tasks, it might interest you to make sure that your Raspberry Pi is only booted when there is a network connection present.
Interface Options
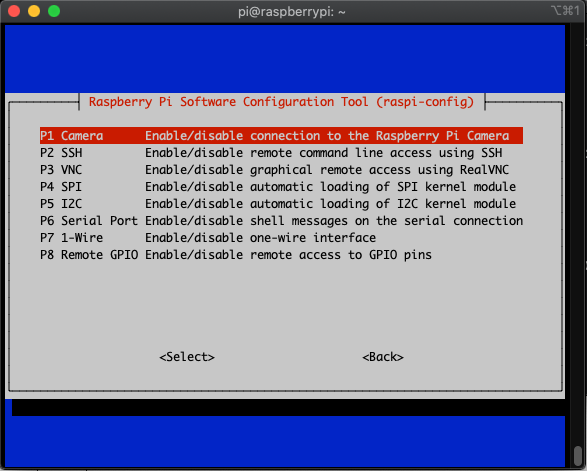
It is good practice to disable all interfaces you do not need. Since I’m not using my RasPi for messing with any prototyping or sensing, and I don’t want a graphical environment, I disable every interface other than SSH.
While it’s unlikely that anyone would break into my home and add an SPI device or a camera to my raspberry pi without me noticing, disabling these kernel modules from being loaded prevents any problems from occurring due to bugs or vulnerabilities that could eventually be introduced or discovered in these modules unexpectedly.
Localization Options
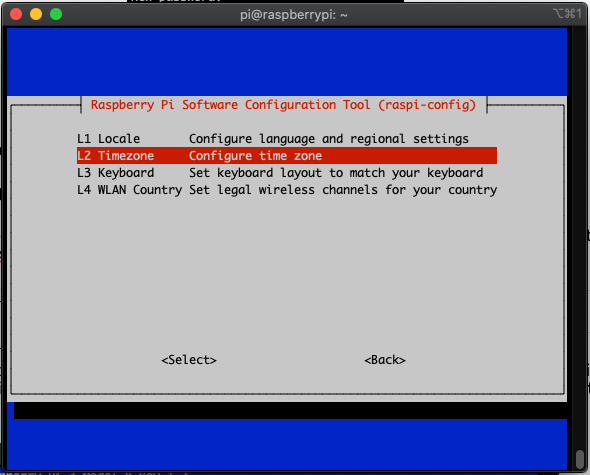
As far as localization goes, I personally only set the timezone. The Pi is usually pretty good at picking up the other things, and since English is my main language I don’t have to really change much else.
If you’re planning on using wifi, you can set your WLAN country in this menu, but you’ll also be asked that already when you configure wifi on the device so you should not need to set it independently.
Advanced Options
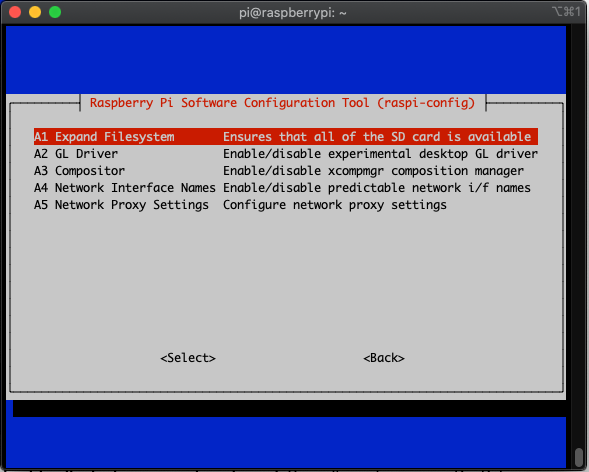
The most critical option to select here is “Expand Filesystem”. The reason for that is that flashing the image on often does not expand it to include the entire card size, and you’ll want to be able to use all of the space on that card (since presumably you won’t be using it for anything else at this point).
If you plan on using things that require you to know the network interface, the “Network Interface Names” option should help you, but your mileage may vary. In my case, when I set “predictable network interface names” to be enabled, it made the ethernet interface be a very long string, whereas disabling it set the interface name to “eth0”, which was what I had expected.
Wrapping Up
Once you’re finished with these settings, you can navigate to “Finish” and press Enter. It will prompt you for reboot, which is exactly what we need to do considering that we changed the partition size on our SD card.
After the Pi finishes rebooting, you’re all set! You should now be able to SSH into your raspberry pi whenever you’d like from your local network.
As a review, this is what we’ve gone over in this guide:
- Using the Raspberry Pi Imager to install a Lite version of the Raspberry Pi OS on a micro SD card
- Enabling the SSH server on the Raspberry Pi at boot time
- Connecting to the Raspberry Pi over SSH through Ethernet
- Changing the password on a user account on the Raspberry Pi
- Configuring system settings on the Raspberry Pi with raspi-config
For the next guide, we will be going over how to set up passwordless authentication for your Raspberry Pi, which will allow us to connect through how to connect with SSH without having to type the password in the terminal every time.
Enjoy Reading This Article?
Here are some more articles you might like to read next: